MQTT On-Premise Agent - Setup and Configuration Guide
| Platform: | WebMobile |
|---|---|
| Plan Type: | BasicEssentialPremiumEnterprise |
| User Type: | RequesterFull UserAdministrator |
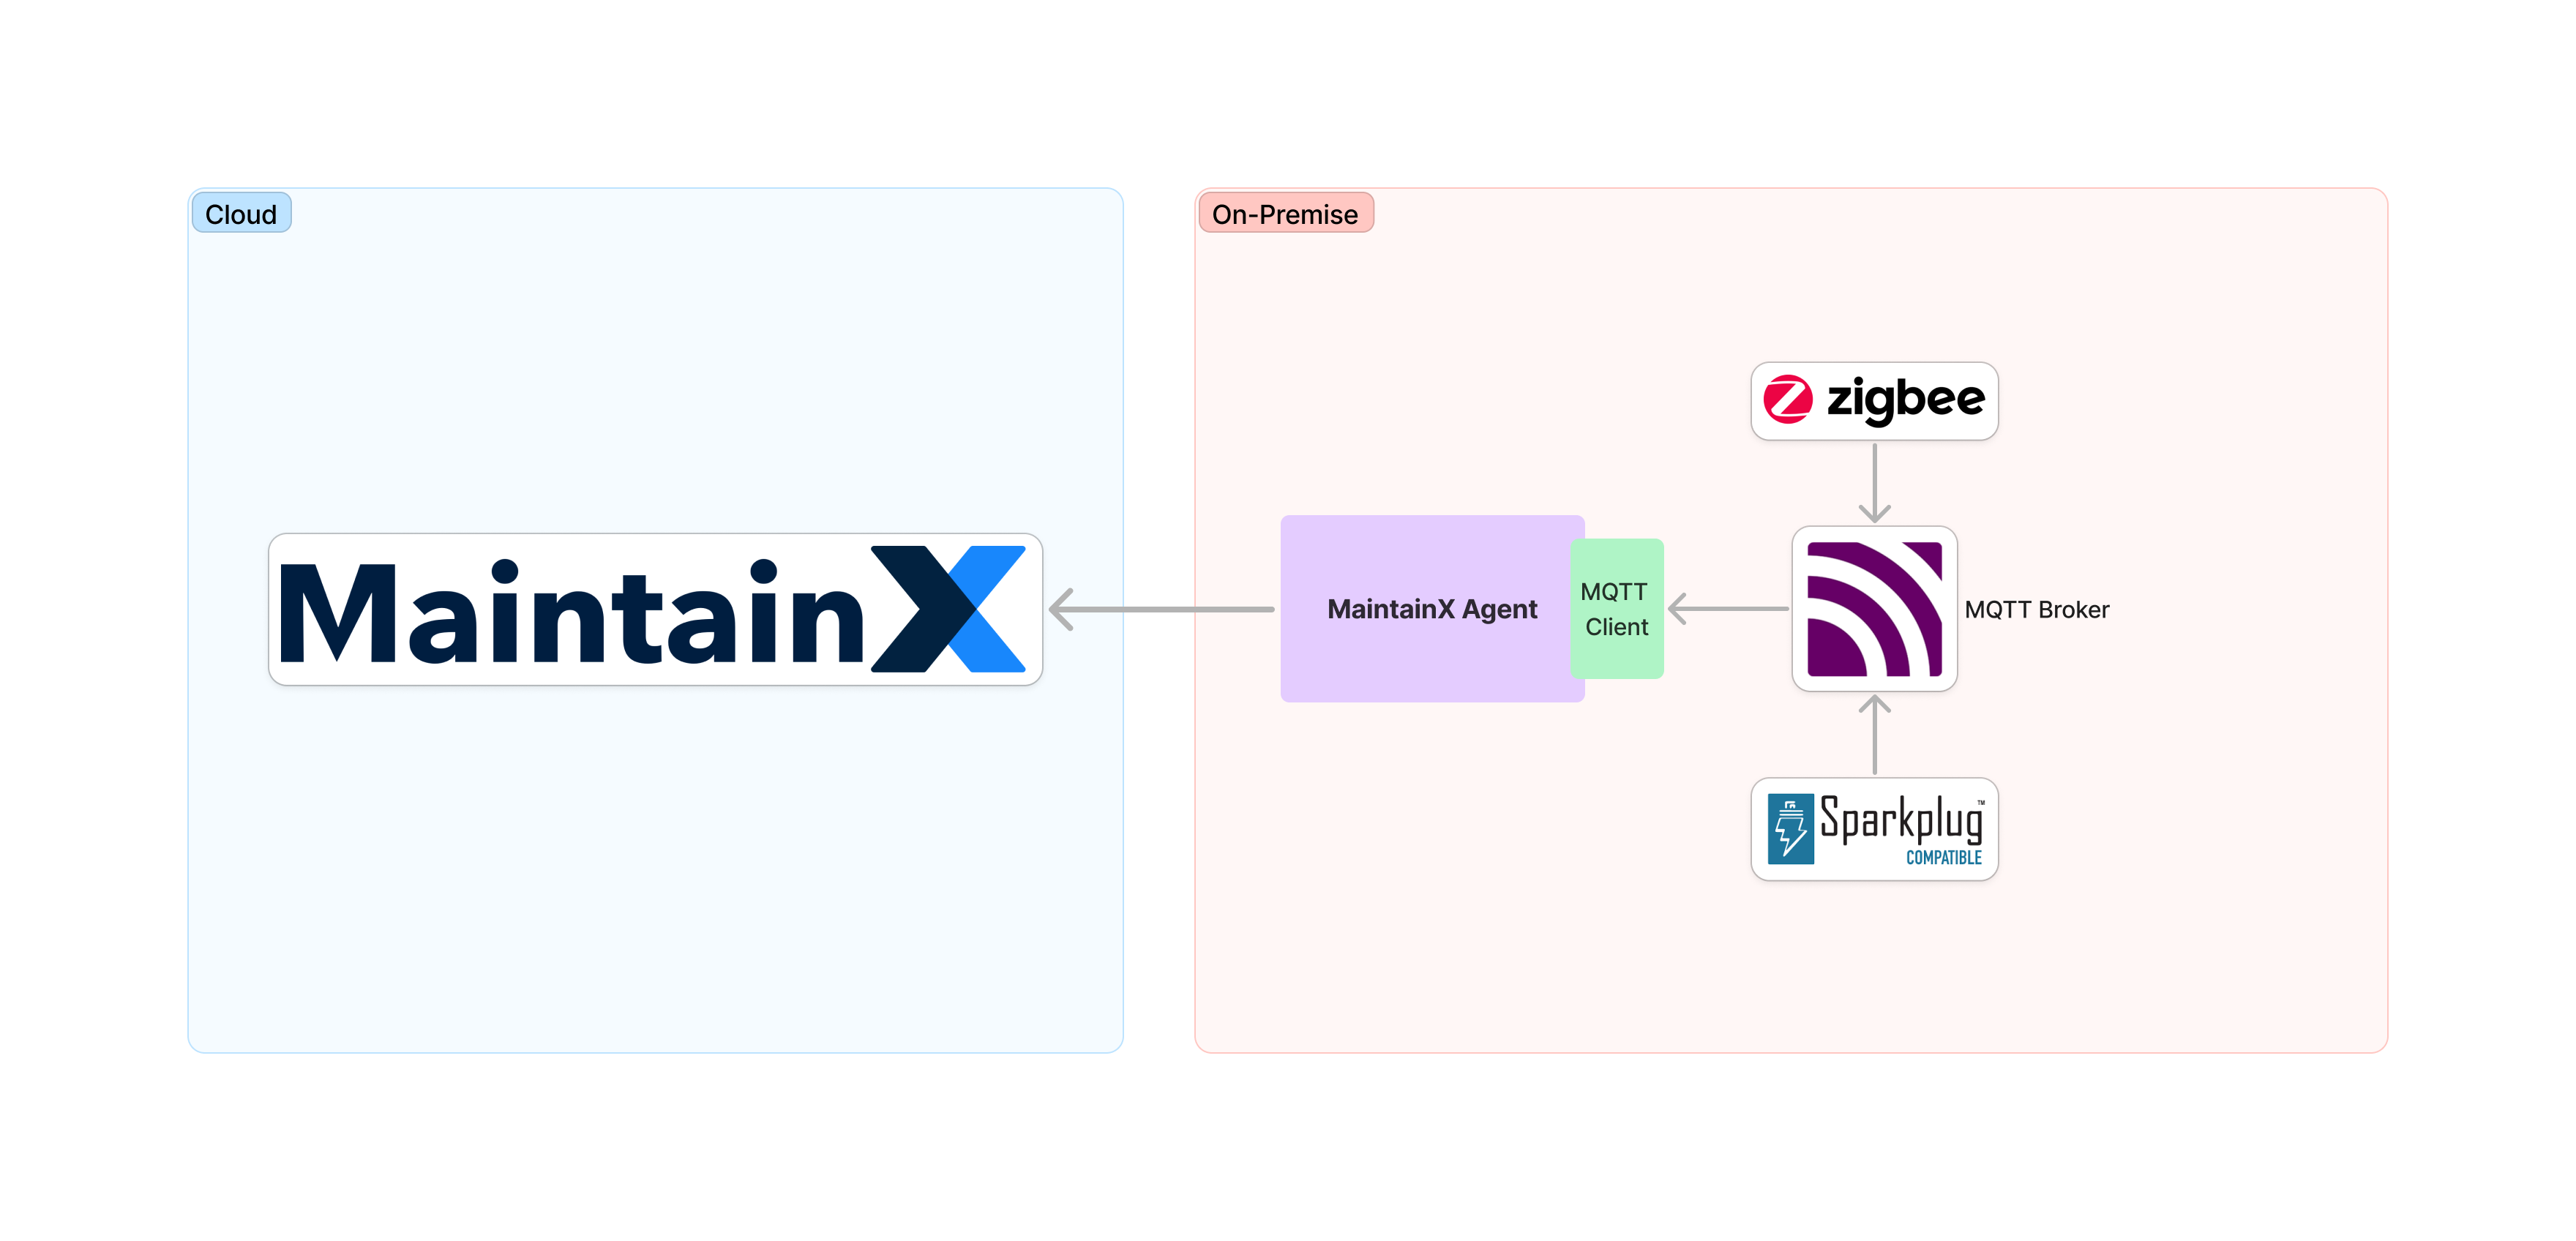
This article explains how to set up the MaintainX On-Premise Agent. The agent connects an MQTT broker to the MaintainX platform so you can see data from your connected sensors in the MaintainX application.
Requirements
Host System
- Operating system: Any operating system with support for Linux-based containers.
- Software: Container runtime such as Docker installed. For more information, see the Docker Installation Guide.
- Network: Ensure that the outgoing network traffic from the host system can access https://agent.maintainx.com/ on port 443.
MQTT Broker
- Messaging broker that uses the MQTT protocol. It receives and publishes messages from different systems such as Sparkplug, Majik or AWS IoT Core.
- Network: Ensure that the MQTT Broker is accessible from the host system.
Sparkplug B MQTT Clients
- Sparkplug B compatible MQTT clients that publish data to the MQTT broker.
- The MaintainX On-Premise Agent operates in read-only mode. It only subscribes to and processes messages that follow the Sparkplug B specification.
MaintainX Account
- Integration Connectors permissions. Please contact your organization's Administrator to request access to the OT Data Connectors feature.
Configuration Overview
You install the MaintainX On-Premise Agent on a host system. Your MQTT broker sends data to the On-Premise agent, and the On-Premise agent connects to an instance of the MQTT connector integration in the MaintainX application using a unique access token.
You can create multiple instances of the MQTT connector in MaintainX. In that case, each instance requires its own:
- MQTT broker.
- Host system.
- MaintainX On-premise agent.
- MaintainX MQTT connector integration instance.
Create a Connector and an Access Token
To configure the MaintainX On-Premise Agent, you need an access token. The token authenticates the MaintainX On-Premise Agent with the MaintainX platform. For security purposes, every MQTT instance must have its own token.
It's important to keep your token secure. Do not share it with unauthorized users.
-
Log into MaintainX as an Administrator.
-
From the sidebar, open the Settings menu. From the Organization Settings section, select Integrations.
-
On the Integrations page, go to the Connectors tab.
-
Navigate to the MQTT connector, and select Connect. The MQTT dialog appears.
-
Select + Create New Instance.
-
Follow the steps to create a new MQTT instance until the Token appears.
-
Copy the Token and save it for later use.
noteThe Token is only displayed once when you create the MQTT instance. If you lose the token for an MQTT instance, you can revoke it and create a new one. See Revoke and Regenerate an MQTT Access Token.
Configure the Host System
-
Log into the host system.
-
Create a workspace directory for the MaintainX On-Premise Agent. Then navigate to that directory.
mkdir -p ~/.maintainx/sensor-connect
cd ~/.maintainx/sensor-connect -
In the workspace directory, create a configuration file named
settings.json. -
Edit the configuration file, and add the following information:
{
    "Integration": {
        "AccessToken": "{MaintainX-Connector-Token}"
    },
    "Mqtt": {
        "client": {
            "credentials": {
                "username": "{MQTT-Broker-Username}",
                "password": "{MQTT-Broker-Password}"
            },
            "tcpServer": {
                "server": "{MQTT-Broker-Host}",
                "port": {MQTT-Broker-Port}
            }
        }
    }
}
Definition of the fields in the
settings.jsonfile:Line Field Type Description 3 MaintainX-Connector-TokenString Access token you copied when you created a new MQTT instance. It is used for authentication to the MaintainX platform. 8 MQTT-Broker-UsernameString Username to authenticate to your MQTT Broker. 9 MQTT-Broker-PasswordString Password to authenticate to your MQTT Broker. 12 MQTT-Broker-HostString Host URL of your MQTT Broker. This information can be found in your MQTT configuration. 13 MQTT-Broker-PortNumber Port number of your MQTT Broker.
Install the MaintainX On-Premise Agent on the Host System
-
Log into the host system.
-
From the command line, download the Docker image for the MaintainX On-Premise Agent.
docker pull maintainx/on-premise-agent:latest -
Start the Docker container.
docker run -d --name on-premise-agent -v $HOME/.maintainx/sensor-connect:/config maintainx/on-premise-agent -
Verify that the agent is running and connected to your MQTT Broker and no error messages are displayed.
docker logs -f on-premise-agentIf the agent is running and connected to your MQTT Broker, the following log messages are displayed:
Connected to MQTT broker host '{MQTT-Broker-Host}' on port '{MQTT-Broker-Port}'.
Listener started. Polling every 50 ms and uploading every 20 seconds
The MaintainX On-Premise Agent is now running and connected to your MQTT Broker. Sensor data from your MQTT broker will now be synchronized to the MaintainX platform.
Update the On-Premise Agent
The process stops the current container and starts a new one with the updated image. During that time, no data is being sent to the MaintainX platform.
The configuration file settings.json is not overwritten when you update the On-Premise Agent. If you need to
update the configuration, you will need to update the file manually beforehand.
-
Pull the latest version of the MaintainX On-Premise Agent:
docker pull maintainx/on-premise-agent:latest -
From the command line, run the following command to stop the current container:
docker stop on-premise-agent -
Remove the current container:
docker rm on-premise-agent -
Start the new version of the MaintainX On-Premise Agent:
docker run -d --name on-premise-agent -v $HOME/.maintainx/sensor-connect:/config -v $HOME/.maintainx/opa-certificates:/run/secrets maintainx/on-premise-agent:latestnoteIf you made any additional changes when running the
docker runcommand initially, you will need to reapply them here again. -
Verify that the agent is running and connected to your MQTT Broker, and no error messages are displayed.
docker logs -f on-premise-agent
Revoke and Regenerate an MQTT Access Token
The access token for an MQTT instance is only displayed once, when you first create the instance. If you lose the token, you can revoke it and generate a new one.
To revoke and regenerate a token:
-
Log into MaintainX as an Administrator.
-
From the sidebar, select Settings, and under ORGANIZATION SETTINGS, select Integrations.
-
On the Integrations page, go to the Connectors tab.
-
Navigate to the MQTT connector, and select Manage.
-
In the MQTT dialog, go to the Instances list and select the instance whose token you want to revoke.
-
In the Manage Instance dialog, select Revoke Token.
The instance's Status changes to Disconnected, and in the Token field shows Revoked.
-
Select Generate New Token.
-
Copy the new token from the Token field.
On the host system for the instance, you have to edit the configuration (settings.json) and replace the old token with the new one.
TLS and Certificate Authentication Configurations
By default, the MaintainX On-Premise Agent uses a secure Transport Layer Security (TLS) connection to communicate with the MQTT broker. It only trusts certificates signed by recognized authorities. You can configure client certificate authentication independently or in addition to credentials authentication. Additionally, you can add your own Certificate Authority's (CA) certificate to validate your MQTT server's certificate on each connection.
Although you can turn off TLS or allow untrusted certificates, please do not do it for production environments! Doing so could leave your data vulnerable to interception or tampering by malicious actors.
Here's an example of a settings.json file with TLS, client certificate authentication, and CA certificate trust configurations:
 {
   "Integration": {
     "AccessToken": "{MaintainX-Connector-Token}"
   },
   "Mqtt": {
     "client": {
       "tcpServer": {
         "server": "{MQTT_Broker_Host}",
         "port": {MQTT-Broker-Port}
       },
       "credentials": {
         "username": "{MQTT_Broker_Username}",
         "password": "{MQTT_Broker_Password}"
       },
       "tls": {
         "useTls": {TLS-Enabled},
         "allowUntrustedCertificates": {Allow-Untrusted-Certificates},
         "ClientCertificateMode": "{Client-Certificate-Mode}",
         "ClientCertificate": "{Client-Certificate}",
         "CertificateKeyMode": "{Private-Key-Mode}",
         "CertificateKey": "{Private-Key}",
         "CertificateAuthorityMode": "{CA-Certificate-Mode}",
         "CertificateAuthority": "{CA-Certificate}"
       }
     }
   }
 }
TLS Settings Fields
Definition of the TLS fields in the settings.json file:
| Line | Field | Type | Values | Default | Required? | Description |
|---|---|---|---|---|---|---|
| 16 | TLS-Enabled | Boolean | true, false | true | No | Enables or disables communication over TLS. |
| 17 | Allow-Untrusted-Certificates | Boolean | true, false | false | No | When set to true, trust any certificate sent by the server including self-signed certificates |
| 18 | Client-Certificate-Mode | Enum | Base64, Raw, Path | Path | If Client-Certificate is set. | The mode used to supply the client certificate. The required format for the Client-Certificate field changes depending on the value you provide here. For details, see Certificate Modes. |
| 19 | Client-Certificate | String | null | No | The client certificate presented to the server for authentication. If you set this field, you must also set the following fields: - Client-Certificate-Mode - Private-Key | |
| 20 | Private-Key-Mode | Enum | Base64, Raw, Path | Path | If Private-Key is set. | The mode used to supply the client certificate's private key. The required format for the Private-Key field changes depending on the value you provide here. For details, see Certificate Modes. |
| 21 | Private-Key | String | null | No | The private key of the client certificate. If you set this field, you must also set the following fields: - Private-Key-Mode | |
| 22 | CA-Certificate-Mode | Enum | Base64, Raw, Path | Path | If CA-Certificate is set. | The mode used to supply the CA certificate. The required format for the CA-Certificate field changes depending on the value you provide here. For details, see Certificate Modes. |
| 23 | CA-Certificate | String | null | No | The CA certificate of the MQTT server's certificate. If you set this field, you must also set the following field: - CA-Certificate-Mode |
Certificate Modes
Definition of the certificate modes in the settings.json file:
| Type | Description | Example |
|---|---|---|
Base64 | Allows you to input a base64 encoded string of the raw certificate. You can take the raw certificate string starting with -----BEGIN CERTIFICATE----- or -----BEGIN RSA PRIVATE KEY----- and encode it in base64. See Example using Base64 Certificate Strings | LS0tLSWo5STV6VlprUGZLDQpzb2FzNmpn ... otLS0tLUVORCBDRVJUSUZJQ0FURS0tLS0t |
Raw | Allows you to input the raw certificate as string. If you enter the certificate as a one-line string, you have to add the line return character \n for each line return. See Example using Raw Certificate Strings | -----BEGIN CERTIFICATE-----\nMIIDWjCCAkKgAwIBAgI ... vW3g8wRr6lzmvqJNeBYhg==\n-----END CERTIFICATE----- |
Path | Allows you to input the path to a certificate file in the containers. In that case, you must supply the certificate file using volume mounts or Docker secrets. See Example using Path to Certificate Files | /run/secrets/clientcert.pem |
Example: Base64 Certificate Strings
 {
   "Integration": {
     "AccessToken": "CfD....."
   },
   "Mqtt": {
     "client": {
       "tcpServer": {
         "server": "mqtt.broker.com",
         "port": 8883
       },
       "credentials": {
         "username": "mqtt_user",
         "password": "password123"
       },
       "tls": {
         "useTls": true,
         "allowUntrustedCertificates": false,
         "ClientCertificateMode": "Base64",
         "ClientCertificate": "LS0tLSWo5STV6VlprUGZLDQpzb2FzNmpn...c4d1JyNmx6bXZxSk5lQlloZz09DQotLS0tLUVORCBDRVJUSUZJQ0FURS0tLS0t",
         "CertificateKeyMode": "Base64",
         "CertificateKey": "LS0tLS1CRUdJTiBSU0EgUFJJVkFURSBLRVka...drRXBVSW5SU1RmT1FBPT0NCi0tLS0tRU5EIFJTQSBQUklWQVRFIEtFWS0tLS0t",
         "CertificateAuthorityMode": "Base64",
         "CertificateAuthority": "LS0tLS1CRUdJTiBDRVJUSUZJQ0FURS...5vWnNHNHE1V1RQNDY4U1F2dkc1DQotLS0tLUVORCBDRVJUSUZJQ0FURS0tLS0t"
       }
     }
   }
 }
Example: Raw Certificate Strings
 {
   "Integration": {
     "AccessToken": "CfD....."
   },
   "Mqtt": {
     "client": {
       "tcpServer": {
         "server": "mqtt.broker.com",
         "port": 8883
       },
       "credentials": {
         "username": "mqtt_user",
         "password": "password123"
       },
       "tls": {
         "useTls": true,
         "allowUntrustedCertificates": false,
         "ClientCertificateMode": "Raw",
         "ClientCertificate": "-----BEGIN CERTIFICATE-----\nMIIDWjCCAkKgAwIBAgI...vW3g8wRr6lzmvqJNeBYhg==\n-----END CERTIFICATE-----",
         "CertificateKeyMode": "Raw",
         "CertificateKey": "-----BEGIN RSA PRIVATE KEY-----\nMIIEpAIBAAKCAQEA1Q...5Gpkd7kEpnRSTfOQA==\n-----END RSA PRIVATE KEY-----",
         "CertificateAuthorityMode": "Raw",
         "CertificateAuthority": "-----BEGIN CERTIFICATE-----\nMIIDQTCCAimgAADb....oQnoZsG4q5WTP468SQvvG5\n-----END CERTIFICATE-----"
       }
     }
   }
 }
Example: Path to Certificate Files
 {
   "Integration": {
     "AccessToken": "CfD....."
   },
   "Mqtt": {
     "client": {
       "tcpServer": {
         "server": "mqtt.broker.com",
         "port": 8883
       },
       "credentials": {
         "username": "mqtt_user",
         "password": "password123"
       },
       "tls": {
         "useTls": true,
         "allowUntrustedCertificates": false,
         "ClientCertificateMode": "Path",
         "ClientCertificate": "/run/secrets/clientcert.pem",
         "CertificateKeyMode": "Path",
         "CertificateKey": "/run/secrets/clientkey.pem",
         "CertificateAuthorityMode": "Path",
         "CertificateAuthority": "/run/secrets/ca.pem"
       }
     }
   }
 }
Additional On-Premise Agent setup when using Certificate Files
If you are using certificate files, you can mount them using volume mounts.
-
Create a certificate directory for the MaintainX On-Premise Agent. Then navigate to that directory.
 mkdir -p ~/.maintainx/opa-certificates
cd ~/.maintainx/opa-certificates -
Add your certificate files to the directory.
-
Start the MaintainX On-Premise Agent with certificate files mounted from the
$HOME/.maintainx/opa-certificatesfolder on your system:docker run -d --name on-premise-agent -v $HOME/.maintainx/sensor-connect:/config -v $HOME/.maintainx/opa-certificates:/run/secrets maintainx/on-premise-agent:latest
Auto Create Meters
Instead of manually creating meters, you can enable an option to automatically create them when a new MQTT tag is discovered via a connector. The meter name will reflect the path of the tag in MQTT.
To use auto create meters:
- Log into MaintainX as an Administrator.
- From the sidebar, select Settings, and under ORGANIZATION SETTINGS, select Integrations.
- On the Integrations page, go to the Connectors tab.
- Navigate to the MQTT module tile, and select Connect.
- Toggle Auto Create Meters on.
- Follow the steps to create a new MQTT instance and token.
When a new tag is discovered, meters will be created automatically, using data reported by the tag.
Troubleshooting
Agent unable to connect to MQTT Broker
This section provides some troubleshooting advice for when the agent cannot connect to the MQTT broker.
Add your DNS Server to the Docker Container
If you are using the hostname or the fully qualified domain name (FQDN) for your MQTT broker, a Domain Name System (DNS) issue might be preventing the agent from connecting to the MQTT broker.
You might be able to fix this by adding your DNS server to the Docker container. This issue is most commonly observed in Windows environments.
Add the --dns flag to the docker run command:
docker stop  on-premise-agent
docker rm on-premise-agent
docker run --dns={YourDnsIp} -d --name on-premise-agent -v $HOME/.maintainx/sensor-connect:/config -v $HOME/.maintainx/opa-certificates:/run/secrets maintainx/on-premise-agent:latest
You can add --dns={YourDnsIp} for each DNS server you want to add.
Contact the MaintainX Support Team
If you continue to experience trouble with connecting the agent to the MQTT broker, contact the MaintainX Support team.
Resources
- MaintainX On-Premise Agent on the Docker Hub.