Set Up a New SAP User for the Integration
This article explains how to set up a new user in SAP, and configure the permissions required to run the integration with MaintainX®. You'll configure the SAP user specifically to work with the middleware software, Workato. Setting up the SAP user allows the MaintainX and SAP systems to communicate with each other.
Create a New User in SAP
The section explains how to set up a new user in SAP. We recommend you use Communication user type. SAP reserves that user type for RFC communication. Communication users cannot access the SAP user interface.
To create a new user in SAP:
-
From the SAP home screen, enter transaction code:
SU01The User Maintenance screen opens.
-
In the User field, enter the name
WORKATO_INTfor the new user. -
From the application toolbar, select Create
(or Edit > Create from the menu).
The Maintain Users screen opens.
-
Select the Address tab, and navigate to the Person section.
-
In the Last Name field enter
WORKATO_INT. -
Select the Logon Data tab.
-
Set User Type to C Communications Data.
-
In the Password section, enter a password in the New Password and Repeat Password fields.
Keep your password handyYou will need your password later in the setup process to configure the Workato On-premise Agent (OPA).
-
From the toolbar, select Save
(or User > Save from the menu) to save the new user.
Create a MaintainX/SAP Integration Role
Create and assign a new role to the new integration user. This role grants access to specific objects and entities in your SAP system. This section explains how to configure the minimum permissions required to connect to SAP from Workato.
To create and assign a new user role in SAP:
-
From the SAP home screen, enter transaction code:
PFCGThe Role Maintenance screen opens.
-
In the Role field, enter the role name,
Z_AUTH_ROLE_WORKATO, then select Single Role.The Create Roles screen opens.
-
Navigate to the Role options.
-
In the Description field, enter
Authorization role for MaintainX/SAP Integration. -
Navigate to the Authorizations tab.
SAP prompts you to save the role before you can continue. Select Yes.
-
Navigate to the Information About Authorization Profile section.
-
Select the Propose Profile Names
icon next to the Profile Name field.
SAP fills in the Profile Name and Profile Text fields automatically.
-
Navigate to the Edit Authorization Data and Generate Profiles section.
-
Select the Change Authorization Data
icon.
When prompted to save the role, click Yes.
The Change Role: Authorizations screen opens.
-
If you're prompted to choose a template, select Do not select templates.
-
If an information window appears, select the
Continue icon to dismiss it.
Assign Permissions for the MaintainX/SAP Integration Role
This section explains how to assign the permissions your new SAP user needs to run the integration. Workato uses these permissions to authenticate in your SAP system, so it can read and write information.
To assign permission to the user role:
-
In the application toolbar, select Manually.
The Manual selection of authorizations dialog opens.
-
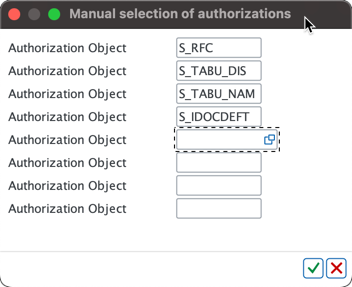
In the Authorization Object fields, add the following objects. Add one object per field.
Object Purpose S_RFCAuthorizes Workato to call certain function group modules. S_TABU_DISDetermines which group of tables using authorization groups users can access. S_TABU_NAMDetermines which tables users can access. This authorization object permits users to access a specific table within an authorization group that they otherwise can't access. S_IDOCDEFTAuthorizes the user for specific IDoc Types. When you're finished, the dialog should look like this:

Manual role authorization selection in SAP ECC6 -
Select the
Continue icon to return to the Change Role: Authorizations screen.
-
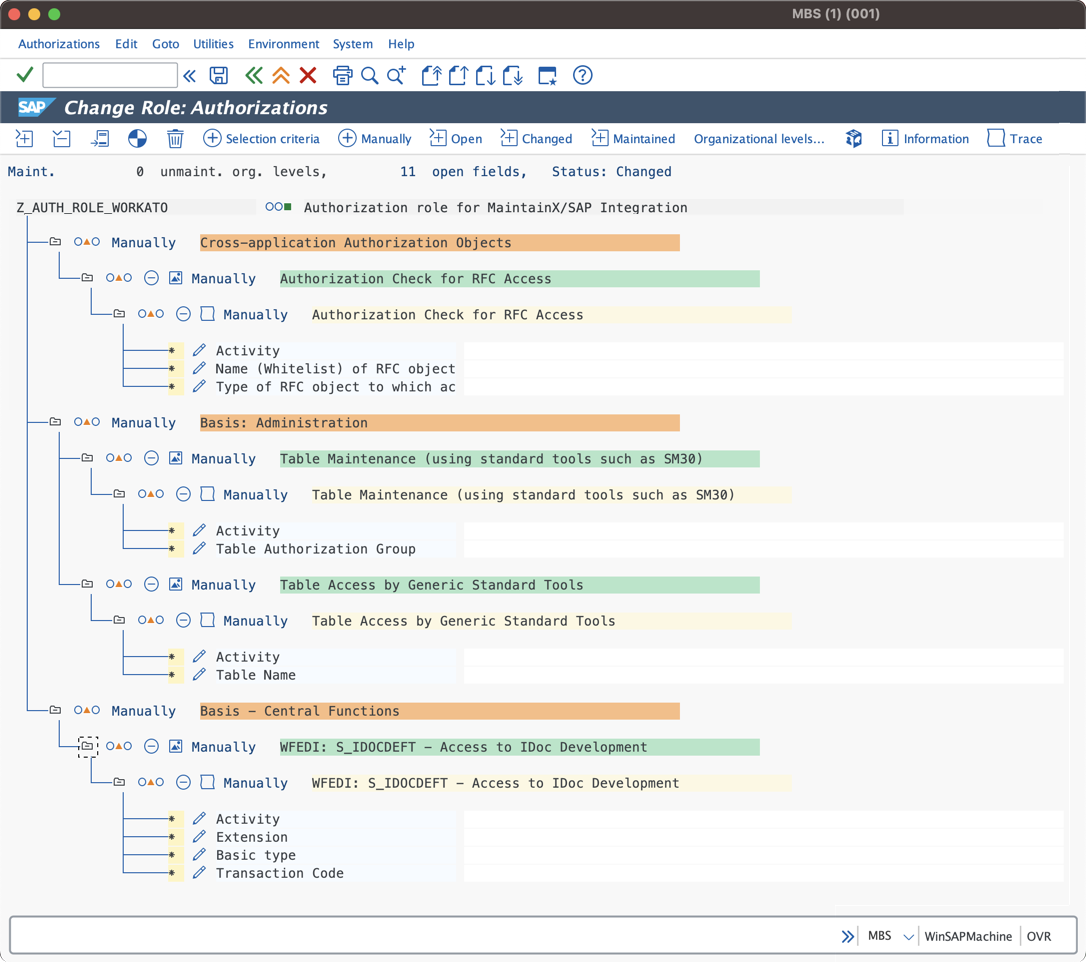
Expand all the new authorizations. Your role should now look like this:

Role authorizations look like this before you configure them
Configure the New Authorizations
After you add the required authorizations to your user role, configure them to specify exactly which permissions your SAP user will have.
To configure the authorizations:
-
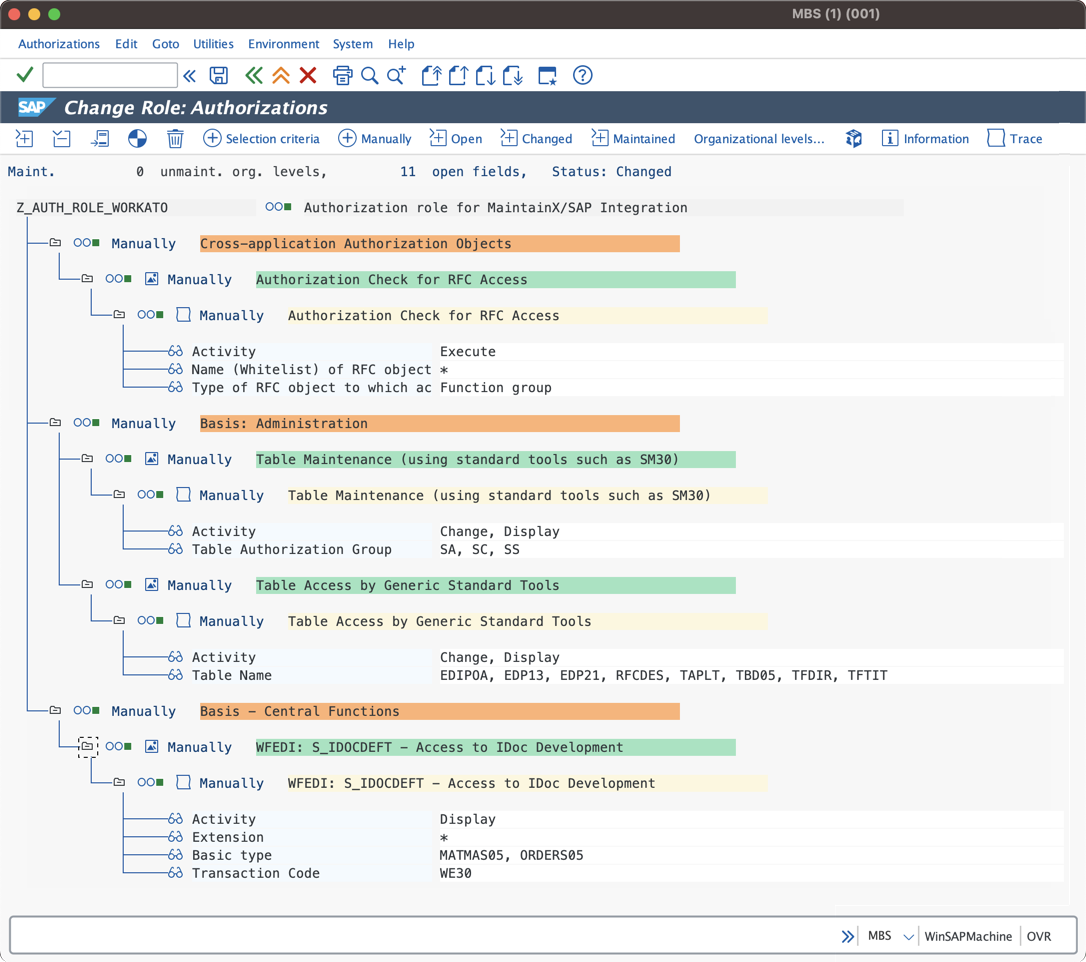
Fill in the authorization field values (white space) for each of the following objects as follows:
- Authorization for RFC Access
- Table Maintenance
- Table Access by Generic Standard Tools
- WFEDI: S_IDOCEFT - Access to IDoc Development
Field Values Activity Select the following: - 16
Name (Whitelist) of RFC object - Full Authorization
Type of RFC object FUGR Field Values Activity Select the following: - 02
- 03
Table Authorization Group All in the From side of column of the table, add the following: SASCSS
Field Values Activity Select the following: - 02
- 03
Table Name All in the From side of the column of the table, add the following: EDIPOAEDP13EDP21RFCDESTAPLTTBD05TFDIRTFTIT
Field Values Activity Select the following: - 03
Extension - Full Authorization
Basic Type For Parts Inventory sync: MATMAS05
ORDERS05
IORDER05
INOTIF01
Transaction Code WE30
The final authorization should look like this:

Role authorizations look like this after you configure them -
From the toolbar, select Save
(or Authorizations > Save from the menu) to save the authorizations.
-
From the application toolbar, select Generate
(or Authorizations > Generate from the menu) to generate the authorizations.
Link the Integration User to the New Role
To complete the user setup, you have to link the new integration user you created in Create a new User in SAP (WORKATO_INT) to the new role you created in Create a MaintainX/SAP Integration Role (Z_AUTH_ROLE_WORKATO).
-
Enter transaction code:
SU01The User Maintenance: Initial Screen opens.
-
In the User field, enter the integration user name:
WORKATO_INT. -
In the application toolbar, select the Change
icon (or ).
The Maintain Users screen opens.
-
Select the Roles tab.
-
In the Role Assignment table, enter
Z_AUTH_ROLE_WORKATOrole you just created in step Create a MaintainX/SAP Integration Role. -
From the toolbar, select Save
(or User > Save from the menu).