Set Up the Workato On-prem Agent
For Workato to connect to SAP, you need to install a Workato On-prem Agent (OPA) on your SAP server. Your MaintainX® Integration representative will provide login credentials for Workato.
This part of the MaintainX SAP ECC6 integration setup happens in the Workato Platform and on your SAP server.
This article provides setup instructions for a Windows server. If you have a Linux or macOS server, some steps will be different.
Open the Workato Environment
-
On your SAP server machine, sign in to Workato.
-
To confirm you're in the correct Workato workspace, hover your mouse over the profile icon in the Workato sidebar.
If you are not in the correct workspace, select the profile icon and choose the correct workspace from the list.
Download the Workato OPA Installer
-
From the Workato sidebar, navigate to the On-prem groups tool (Tools > On-prem groups).
-
On the On-prem groups screen, select the group that your MaintainX Integration representative configured.
Usually, this group is called {COMPANY} On Prem Group.
-
On the on-prem group details screen, select Add on-prem agent.
tipIf this group already has other agents, you'll see an Add agent button instead.
The setup wizard starts.
-
On the Choose OS screen, navigate to the Agent Name field, and enter
{COMPANY} SAP Agent.noteIf you plan to create more than one on-prem agent, add the location of the server in parentheses after the name:
{COMPANY} SAP Agent ({LOCATION}) -
In the Operating System field, select the operating system of your SAP server (This article assumes Windows).
-
Select Next.
-
On the Install Agent screen, select Download Installer.
The installer executable (
.exe) file downloads to your computer. -
Select Next.
-
Leave your browser window open to the on-prem agent setup wizard, and proceed to the next section to install the Workato agent on your SAP server.
Install the Workato OPA
-
On your SAP server machine, locate the executable installer file that you downloaded from Workato.
The installer should have a name similar to:
workato-agent-setup-win-amd64-24.3.exe -
Right-click the file, and select Run as administrator.
-
Follow the installation instructions. You can use the default values for most steps, but you must do the following:
-
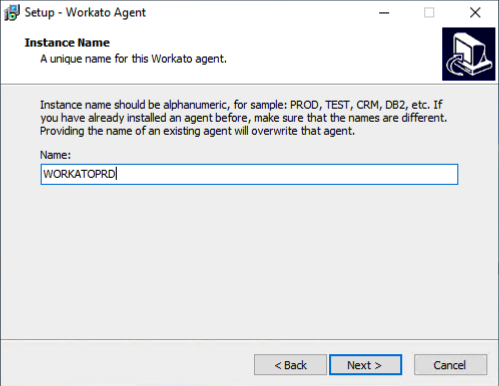
On the Instance Name screen, use the RFC destination name you used in Create a Remote Function Call (RFC) Destination in SAP:
WORKATODEV,WORKATOTST, orWORKATOPRD.
The Workato agent Instance Name should match the RFC destination name you set in SAP -
Select the option to install the agent as a Windows service.
-
Select the option to create a desktop shortcut.
-
-
When prompted, select Install.
Near the end of the installation process, you'll be prompted to activate the agent. The next section explains how to find and use your activation code.
Activate the Workato On-Prem Agent
-
Open the browser window where you have the on-prem agent setup wizard running.
-
Select Next.
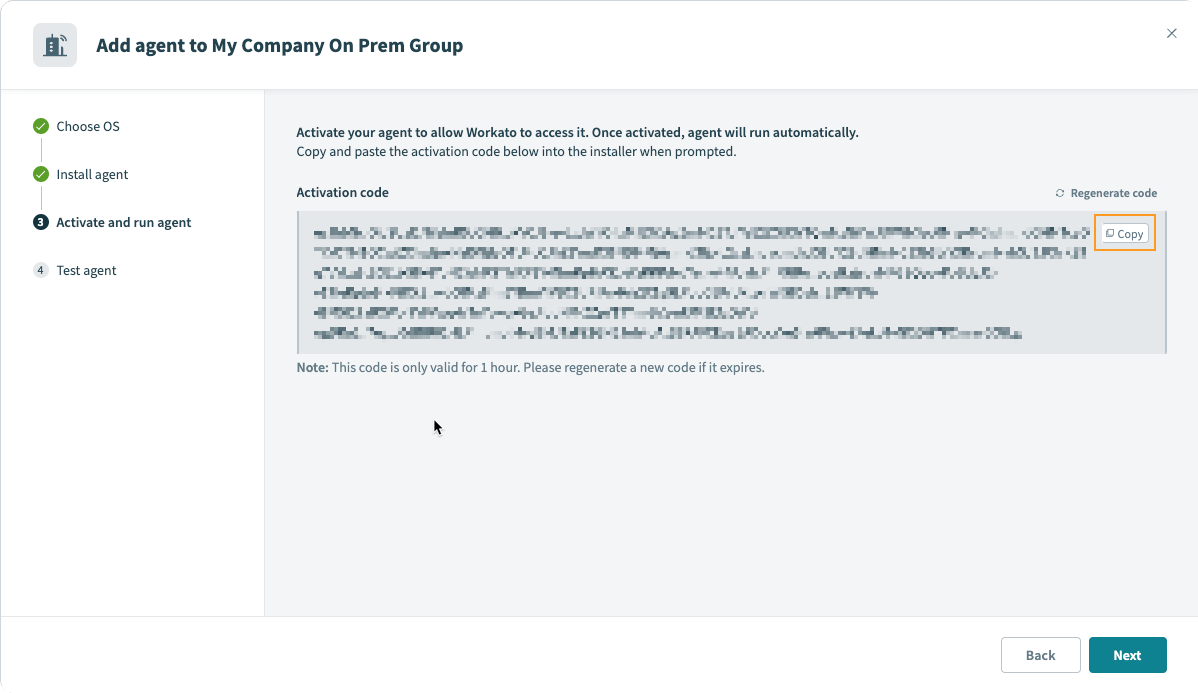
The Activate and run agent screen opens.
-
Select Copy to copy the Activation code to the clipboard.

Copy the activation code for your Workato On-prem Agent -
Return to the Workato Agent installer.
-
Paste the activation code into the Activation Code field.
-
Make sure the Activate agent manually option is not selected.
-
Select Next, then select Finish.
Test the Workato OPA
-
From your Windows desktop, right click the Run {AGENT NAME Agent} shortcut, and select Run as administrator.
The Workato On-prem agent starts, and a console window opens.
-
Return to the browser window where you have the on-prem agent setup wizard running.
-
On the Test agent screen, select Test agent button to verify the connection.
-
Close the console window to shut down the On-prem agent.
Download the SAP JCo Libraries
The SAP JCo libraries make it possible for the Workato OPA to exchange data with your SAP server. You can download them from the SAP Java Connector support page.
If you don't have a license to use the SAP JCo libraries, contact your SAP provider.
-
In a web browser, visit the SAP Java Connector support page.
-
In the Download SAP Java Connector 3.1 SDK section, download the SDK for your SAP server operating system.
tipTo find which version of Windows you're running, from the Windows Start menu, select Settings > About, and check the Device Specifications.
When you select the SDK version, you might be prompted to log into SAP to start the download.
-
In the SAP Java IDoc Library section, select Download SAP Java IDoc Library X.X.X SDK to download the IDoc SDK.
-
Check your downloads folder. You should have two archive (e.g.,
.zip) files:- The Java Connector archive file name starts with
sapjco. - The Java IDoc archive file name starts with
sapjidoc.
- The Java Connector archive file name starts with
-
On your SAP server, create two new directories called:
SAP JCoSAP IDoc
-
Unzip the Java Connector archive file (file name starts with
sapjco).Inside, there is another archive file whose file name starts with
sapjco.Extract this second archive to the SAP JCo folder you created earlier.
-
Extract the Java IDoc archive file (file name starts with
sapjidoc) to the SAP IDoc folder you created earlier. -
Open your Workato installation folder.
If you used the default location when you installed the Workato OPA the path is
C:\Program Files\Workato Agent {ENVIRONMENT NAME}.Where {ENVIRONMENT NAME} is either
WORKATODEV,WORKATOTST, orWORKATOPRD, depending on the environment you're configuring. -
In the Workato installation folder, copy the following downloaded files into the
lib_extfolder:- Windows
- macOS
- Linux
From the SAP JCo folder, copy:
- sapjco3.dll
- sapjco3.jar
From the SAP IDoc folder, copy:
- sapidoc3.jar
The
lib_extfolder should already contain a file namedsap-connector-impl-X.X.X.jar.When you're finished, you should have a total of six files in the
lib_extfolder.Workato Agent {ENVIRONMENT NAME}
└── lib_ext
├── mssql-jdbc_auth-X.X.X.x64.dll
├── mysql-connector-j-8.4.0.jar
├── sap-connector-impl-X.X.X.jar
├── sapidoc3.jar
├── sapjco3.dll
└── sapjco3.jarFrom the SAP JCo folder, copy:
- libsapjco3.dylib
- sapjco3.jar
From the SAP IDoc folder, copy:
- sapidoc3.jar
The
lib_extfolder should already contain a file namedsap-connector-impl-X.X.X.jar.When you're finished, you should have a total of four files in the
lib_extfolder.Workato Agent {ENVIRONMENT NAME}
└── lib_ext
├── libsapjco3.dylib
├── sap-connector-impl-X.X.X.jar
├── sapidoc3.jar
└── sapjco3.jarFrom the SAP JCo folder, copy:
- libsapjco3.so
- sapjco3.jar
From the SAP IDoc folder, copy:
- sapidoc3.jar
The
lib_extfolder should already contain a file namedsap-connector-impl-X.X.X.jar.When you're finished, you should have a total of four files in the
lib_extfolder.Workato Agent {ENVIRONMENT NAME}
└── lib_ext
├── libsapjco3.so
├── sap-connector-impl-X.X.X.jar
├── sapidoc3.jar
└── sapjco3.jar -
To activate the Workato OPA, run the desktop shortcut as administrator.