Configure SAP to Send IDocs to Workato
IDoc is the data structure an SAP system uses to exchange data with other systems. For the MaintainX®/SAP integration to be triggered in real time, Workato must receive IDocs from SAP when activity happens in SAP.
This article explains how to configure your SAP system to send IDocs to Workato.
Define a RFC Port
-
In SAP enter transaction code:
WE21The Ports in IDoc processing screen opens.
-
In the Ports column, expand Ports and select Transactional RFC.
-
In the application toolbar, select Create
 (or Port > Create from the menu).
The Creating a tRFC port dialog opens.
-
In Creating a tRFC port dialog, do the following:
-
Select own port name.
-
In the Name field, enter the name for the Workato environment you're configuring the integration for.
This should match the name of the destination you created in the Create an RFC Destination in SAP: either
WORKATODEV,WORKATOTST, orWORKATOPRD.
-
-
Select the
 Continue icon.
The Creating a tRFC port screen appears.
-
On the Creating a tRFC port screen, do the following:
-
In the Description field, enter
Workato System Port. -
In the RFC destination, enter the destination you created in the Create an RFC Destination in SAP step: Either
WORKATODEV,WORKATOTST, orWORKATOPRD.tipYou can also select the matchcode icon
 in the RFC Destination field to open a list of available destinations, and select the correct Workato destination from the list.
-
-
From the toolbar, select Save
 to save the port.
Create a Logical System
-
In SAP enter transaction code:
SALEThe Display IMG screen opens.
-
In the Structure section, navigate to IDoc Interface / Application Link Enabling (ALE) > Basic Settings > Logical Systems
-
Locate the Define Logical System item, and select the
 Execute icon next to it.
If a Caution dialog appears, select the
Continue icon to dismiss it. -
In the application toolbar, select New Entries.
The New Entries: Overview of Added Entries screen opens.
-
In the Logical Systems table, Fill in the first row as follows:
Field Value Log.System Enter the name of the Workato environment you're configuring the integration for: WORKATODEV,WORKATOTST, orWORKATOPRD.Name Workato ENV System
WhereENVis eitherDev,Test, orProd, depending on the environment you specified in the Log.System field. -
From the toolbar, select Save
(or Table View > Save from the menu).If a warning window appears, select the
Continue icon to confirm the new entry.
The Logical system is now created.
Create a Partner Profile
-
In SAP enter transaction code:
WE20The Partner profiles screen opens.
-
In the Partner table, select the Partner Type LS folder.
-
In the application toolbar, select Create
(or Port > Create from the menu). -
Create a Partner profile, and enter the following values:
Field Value Partner No. The name of the Logical system you created in Create a Logical System: WORKATODEV,WORKATOTST, orWORKATOPRD.Partn. Type LS
Select the matchcode icon to choose from a list.Ty. O(Organizational Unit).
Select the matchcode icon to find the type.Agent Your main organizational unit.
For example,MaintainX root organization.
Select the matchcode icon to find the unit.Lang. EN -
From the toolbar, select Save
(or Partners > Save from the menu) to save the new profile. -
Add outbound parameters to the partner profile.
The outbound parameters map SAP IDocs to MaintainX entities. You need to set up an outbound parameter for each entity type that your integration includes.
- For Parts Inventory, see Add an Outbound Parameter for Material Master/Parts Inventory.
- For Purchase Orders, see Add an Outbound Parameter for Purchase Orders.
Add an Outbound Parameter for Parts Inventory
If your integration includes Parts Inventory in MaintainX, you need to create an outbound parameter for Material Master in SAP.
While editing your partner profile on the Partner Profiles screen, do the following:
-
Navigate to the Outbound parmtrs. section.
-
In the Outbound parmtrs. section toolbar, select
 Create Outbound Parameter.
The Partner profiles: Outbound parameters screen opens.
-
In the Message Type field, enter
MATMAS. -
Navigate to the Outbound Options tab and set the following values:
Field Value Receiver Port The name of the logical system you created in Create a Logical System: WORKATODEV,WORKATOTST, orWORKATOPRD.Output Mode Pass IDoc Immediately and Do not start subsystem Basic Type MATMAS05 -
Navigate to the Post Processing: Permitted Agent tab, and set the following values:
Field Value Ty. US(User)Agent WORKATO_INTLang. EN -
From the toolbar, select Save
(or Outbound parameters > Save from the menu) to save the new parameter and return to the Partner Profiles screen.
Add an Outbound Parameter for Vendors
If your integration includes Purchase order Sync in MaintainX, you need to create an outbound parameter for Vendors Master in SAP.
While editing your partner profile on the Partner Profiles screen, do the following:
-
Navigate to the Outbound parmtrs. section.
-
In the Outbound parmtrs. section toolbar, select
Create Outbound Parameter.The Partner profiles: Outbound parameters screen opens.
-
In the Message Type field, enter
CREMAS. -
Navigate to the Outbound Options tab and set the following values:
Field Value Receiver Port The name of the logical system you created in Create a Logical System: WORKATODEV,WORKATOTST, orWORKATOPRD.Output Mode Pass IDoc Immediately and Do not start subsystem Basic Type CREMAS06 -
Navigate to the Post Processing: Permitted Agent tab, and set the following values:
Field Value Ty. US(User)Agent WORKATO_INTLang. EN -
From the toolbar, select Save
(or Outbound parameters > Save from the menu) to save the new parameter and return to the Partner Profiles screen.
Add an Outbound Parameter for Purchase Orders
If your integration includes Purchase Orders in MaintainX, you need to create an outbound parameter for Purchase Orders in SAP.
While editing your partner profile on the Partner Profiles screen, do the following:
-
Navigate to the Outbound parmtrs. section.
-
In the Outbound parmtrs. section toolbar, select
Create Outbound Parameter.The Partner profiles: Outbound parameters screen opens.
-
In the Message Type field, enter
ORDERS. -
In the Partner Role field, enter
LS.If a warning appears, press Enter to override it.
-
Navigate to the Outbound Options tab and set the following values:
Field Value Receiver Port The name of the Logical system you created in Create a Logical System: WORKATODEV,WORKATOTST, orWORKATOPRD.Output Mode Pass IDoc Immediately and Do not start subsystem Basic Type ORDERS05 -
Navigate to the Message Control tab.
-
From the Message Control table toolbar, select
Insert Row.A new row is added to the Message Control table.
-
In the new row, enter the following values:
Field Value Application EFMessage type NEUProcess code ME10Change Message Unchecked (False) -
Select
Insert Row again to create another row in the Message Control table. In the new row, enter the following values:Field Value Application EFMessage type NEUProcess code ME10Change Message Checked (True) -
Navigate to the Post Processing: Permitted Agent tab, and set the following values:
Field Value Ty. US(User)Agent WORKATO_INTLang. EN -
From the toolbar, select Save
(or Outbound parameters > Save from the menu) to save the new parameter and return to the Partner Profiles screen.
Add an Outbound Parameter for Maintenance Notifications
If your integration includes Work Request Sync in MaintainX, you need to create an outbound parameter for Maintenance Notifications in SAP.
While editing your partner profile on the Partner Profiles screen, do the following:
-
Navigate to the Outbound parmtrs. section.
-
In the Outbound parmtrs. section toolbar, select
Create Outbound Parameter.The Partner profiles: Outbound parameters screen opens.
-
In the Message Type field, enter
INOTIF. -
Navigate to the Outbound Options tab and set the following values:
Field Value Receiver Port The name of the logical system you created in Create a Logical System: WORKATODEV,WORKATOTST, orWORKATOPRD.Output Mode Pass IDoc Immediately and Do not start subsystem Basic Type INOTIF01 -
Navigate to the Post Processing: Permitted Agent tab, and set the following values:
Field Value Ty. US(User)Agent WORKATO_INTLang. EN -
From the toolbar, select Save
(or Outbound parameters > Save from the menu) to save the new parameter and return to the Partner Profiles screen.
Add an Outbound Parameter for Maintenance Orders
If your integration includes Work Order Sync in MaintainX, you need to create an outbound parameter for Maintenance Orders in SAP.
While editing your partner profile on the Partner Profiles screen, do the following:
-
Navigate to the Outbound parmtrs. section.
-
In the Outbound parmtrs. section toolbar, select Create Outbound Parameter.
The Partner profiles: Outbound parameters screen opens.
-
In the Message Type field, enter
IORDER. -
Navigate to the Outbound Options tab and set the following values:
Field Value Receiver Port The name of the logical system you created in Create a Logical System: WORKATODEV,WORKATOTST, orWORKATOPRD.Output Mode Pass IDoc Immediately and Do not start subsystem Basic Type IORDER01 -
Navigate to the Post Processing: Permitted Agent tab, and set the following values:
Field Value Ty. US(User)Agent WORKATO_INTLang. EN -
From the toolbar, select Save
(or Outbound parameters > Save from the menu) to save the new parameter and return to the Partner Profiles screen.
Create an Output Condition (Purchase Orders Only)
If your integration includes Purchase Orders in MaintainX, you have to configure an output condition in SAP to receive messages when a purchase order is created or changed.
To create an output condition:
-
In SAP enter transaction code:
NACEThe Conditions for Output Control screen opens.
-
In the Application column, select EF.
-
In the application toolbar, select Condition Records.
The Output Types dialog opens.
-
Select Output Type NEU, then select the
Continue icon.The Key Combination dialog opens.
-
Select Purchasing Output Determination: Document Type option, then select the
Continue icon.The Change Purchase order (NEU): Selection screen appears.
-
Leave the default values, and, in the application toolbar, select the
Execute icon.The Change Condition Records (Purchase order): Fast Change screen appears.
-
In the Condition Recs. table, add a new row by entering the following values:
Field Value Doc. Type NBName Standard POFunct. LSPartner WORKATODEV,WORKATOTST, orWORKATOPRDMedium 6Date/Time 4Language ENThe table should look like this:
-
From the toolbar, select Save
(or Outbound conditions > Save from the menu).The Output Types dialog opens again.
-
Select the
Continue icon.
Run the INOT Report to Send the Maintenance Notification IDoc (Work Requests Only)
If your integration includes Work Requests in MaintainX, you have to run a report in SAP to send messages when a maintenance notification is created or changed.
The Maintenance Notification IDoc is sent via the INOT transaction code, which runs the ABAP program, IREAD_NOTIFICATIONS.
Alternatively, you can create a custom report to send this IDoc. For more information, see Run a Custom Report to Send the Maintenance Order and Maintenance Notification IDocs.
Requirements
Before you send the Maintenance Notification IDoc, make sure your SAP installation meets the following criteria:
-
The Status profile and User status fields must be predefined. These fields are required by the
INOTtransaction code.The system updates maintenance notifications with the User status when the IDoc is sent successfully.
-
Status should be maintained in SPRO and exits for the both: Maintenance Notification and Task within the Item
-
Items with the Tasks should exist within Maintenance Notification.
Send the Maintenance Notification IDoc
To send a Maintenance Notification IDoc:
-
In SAP enter transaction code:
INOTThe report screen opens.
-
On the Selection criteria screen, you can specify different options for Maintenance Notifications.
-
Select Run.
Schedule a Job to Send the Maintenance Notification IDoc Automatically
To send the Maintenance Notification IDoc automatically, you can schedule an SAP job using transaction code SM36 for the IREAD_NOTIFICATIONS program and custom variants.
For more information, see Scheduling Background Jobs in the SAP documentation.
Run the IORD Report to Send the Maintenance Order IDoc (Work Orders Only)
If your integration includes Work Orders in MaintainX, you have to run a report in SAP to send messages when a maintenance order is created or changed.
The Maintenance Order IDoc is sent using transaction code IORD, which runs the ABAP program, IREAD_SM_PM_ORDERS.
Alternatively, you can create a custom report to send this IDoc. For more information, see Run a Custom Report to Send the Maintenance Order and Maintenance Notification IDocs.
Requirements
Before you send the Maintenance Order IDoc, make sure your SAP installation meets the following criteria:
-
The Status profile and User status fields must be predefined. These fields are required by the
IORDtransaction code.The system updates maintenance orders with the User status when the IDoc is sent successfully.
-
Status should be maintained in SPRO and exits for the both: Maintenance Order and PP/PM: operation.
-
Operations should exist within the Maintenance Order.
Send the Maintenance Order IDoc
To send a Maintenance Order IDoc:
-
In SAP enter transaction code:
IORDThe report screen opens.
-
On the Selection criteria screen, you can specify different options for Maintenance Orders.
-
Select Run.
Schedule a Job to Send the Maintenance Order IDoc Automatically
To send the Maintenance Order IDoc automatically, you can schedule an SAP job using transaction code SM36 for the IREAD_SM_PM_ORDERS program and custom variants.
For more information, see Scheduling Background Jobs in the SAP documentation.
Run a Custom Report to Send the Maintenance Order and Maintenance Notification IDocs
If you're using the standard SAP reports to send the Maintenance Notification and Maintenance Order IDocs, skip this section.
Instead of using the standard INOT and IORD reports to send Maintenance Order and Maintenance Notification IDocs, you can write a custom report that calls the MASTER_IDOC_DISTRIBUTE function module to create the IDoc and add it to the outbound queue.
For more information, see Call of MASTER_IDOC_DISTRIBUTE in the SAP documentation.
For an example, see Example Program for Generating an IDoc in the SAP documentation.
Create a Distribution Model with Message Types
-
In SAP enter transaction code:
BD64The Display Distribution Model screen opens.
-
In the application toolbar, select
 Switch Between Display and Edit Mode to activate edit mode.
 -
In the application toolbar select
Create Model View.The Create Model View dialog appears
-
Enter the following Model View values:
Field Value Short text Model View for WorkatoTechnical Name WORKATODEV,WORKATOTST, orWORKATOPRD -
Select the
Continue icon to add your distribution model. -
In the Distribution Model column, select the distribution model you just created.
Add the Message Type for Materials
-
In the application toolbar, select
Add Message Type.The Add Message Type dialog opens.
-
To create the message type for Materials, enter the following values.
Field Value Model view WORKATODEV,WORKATOTST, orWORKATOPRDSender This should be your SAP system.
Select the matchcode icon to choose from a list.Receiver WORKATODEV,WORKATOTST, orWORKATOPRDMessage Type MATMAS -
Select the
Continue icon.
Add the Message Type for Purchase Orders
-
In the application toolbar, select Add Message Type again.
The Add Message Type dialog opens.
-
To create the message type for Purchase Orders, enter the following values.
Field Value Model view WORKATODEV,WORKATOTST, orWORKATOPRDSender This should be your SAP system.
Select the matchcode iconReceiver WORKATODEV,WORKATOTST, orWORKATOPRDMessage Type ORDERS -
Select the
Continue icon.
Add the Message Type for Vendors
-
In the application toolbar, select Add Message Type again.
The Add Message Type dialog opens.
-
To create the message type for Vendors, enter the following values.
Field Value Model view WORKATODEV,WORKATOTST, orWORKATOPRDSender This should be your SAP system.
Select the matchcode iconReceiver WORKATODEV,WORKATOTST, orWORKATOPRDMessage Type CREMAS -
Select the
Continue icon.
Add the Message Type for Maintenance Notifications
-
In the application toolbar, select Add Message Type again.
The Add Message Type dialog opens.
-
To create the message type for Maintenance Notifications, enter the following values.
Field Value Model view WORKATODEV,WORKATOTST, orWORKATOPRDSender This should be your SAP system.
Select the matchcode iconReceiver WORKATODEV,WORKATOTST, orWORKATOPRDMessage Type INOTIF -
Select the
Continue icon.
Add the Message Type for Maintenance Orders
-
In the application toolbar, select Add Message Type again.
The Add Message Type dialog opens.
-
To create the message type for Maintenance Orders, enter the following values.
Field Value Model view WORKATODEV,WORKATOTST, orWORKATOPRDSender This should be your SAP system.
Select the matchcode iconReceiver WORKATODEV,WORKATOTST, orWORKATOPRDMessage Type IORDER -
Select the
Continue icon.
Save the Distribution Model
-
From the toolbar, select Save
(or Distribution Model > Save from the menu).Your distribution model should look like this:
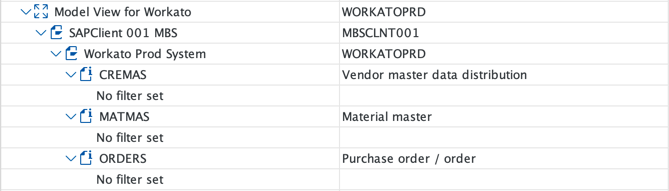
Your new distribution model noteInstead of SAPClient 001 MBS you should see the name of your SAP system.