Configure SSO with Microsoft Entra ID
| Platform: | AvailableWebNot availableMobile |
|---|---|
| Plan Type: | Not availableBasicNot availableEssentialNot availablePremiumAvailableEnterprise |
| User Type: | Not availableRequesterNot availableFull UserAvailableAdministrator |
This article explains how to set up single sign-on (SSO) for MaintainX® using Microsoft Entra ID as the identity provider (IdP).
In 2023, Microsoft renamed Microsoft Active Directory to Microsoft Entra ID. If you're looking for MaintainX SSO setup instructions for Azure AD, this is the right page. We've updated it to use the Entra ID name, and tested the instructions in the Entra ID interface.
Requirements
- A MaintainX Enterprise account.
- An Administrator user profile with access to the MaintainX organizations you want to set up SSO for.
- Access to the Microsoft Entra ID admin center with the privileges needed to set up SSO.
Get Your MaintainX® Configuration Information
-
Log into MaintainX as an Administrator.
-
From the sidebar, open the Settings menu and select Customizations.
-
On the Customizations tab, go to Single Sign-On (SSO) Self-Serve and select Set SSO Preferences.
-
If MaintainX doesn't have IdP information for your organization, the Register Identity Provider dialog opens.
Select Create to generate your IdP information and open the Single Sign-On Configuration dialog.
-
If MaintainX does have IdP information for your organization, the Single Sign-On Configuration dialog opens right away.
-
Leave the Single Sign-On Configuration dialog open. During the configuration, you will need to copy some values from Entra ID into MaintainX and copy some values from MaintainX into the Entra ID admin center.
Create an Application in Microsoft
-
Log into the Microsoft Entra ID admin center.
-
From the sidebar, select Identity > Applications > Enterprise applications.
-
In the Enterprise applications pane, select + New application.
-
Select + Create your own application. A dialog box opens.
-
In the dialog box, do the following:
- Set the name of your application. We recommend you set it to
MaintainX. - Select Integrate any other application you don't find in the gallery.
- Select Create.
- Set the name of your application. We recommend you set it to
The Entra ID admin center displays the settings and details for your new application.
Copy Your SSO URLs from MaintainX to Entra ID
In MaintainX:
-
Open the Single Sign-On Configuration dialog.
-
Locate the URLs in the following fields. You will need to copy them into the Entra ID admin center console:
- Entity ID (Audience URI)
- ACS URL
- Start URL
In the Entra ID admin center:
-
In your application settings sidebar, navigate to the Manage section and select Single sign-on. The Single sign-on pane opens.
-
Select SAML as the single sign-on method. The SSO configuration page opens.
-
Go to the Basic SAML Configuration section and select Edit.
-
In the Basic SAML Configuration options, copy the URLs from the MaintainX Single Sign-On Configuration into the correct Entra ID fields:
MaintainX Value URL Entra ID Field Entity ID
(Audience URI)https://www.okta.com/saml2/service-provider/<your-maintainx-sso-entity-id>Identifier (Entity ID) ACS URL https://maintainx.okta.com/sso/saml2/<your-maintainx-sso-entity-id>Reply URL (Assertion Consume Service URL) Start URL https://app.getmaintainx.com/auth/login/saml/<your-maintainx-sso-entity-id>Sign on URL (Optional)
Relay State (Optional) -
Select Save.
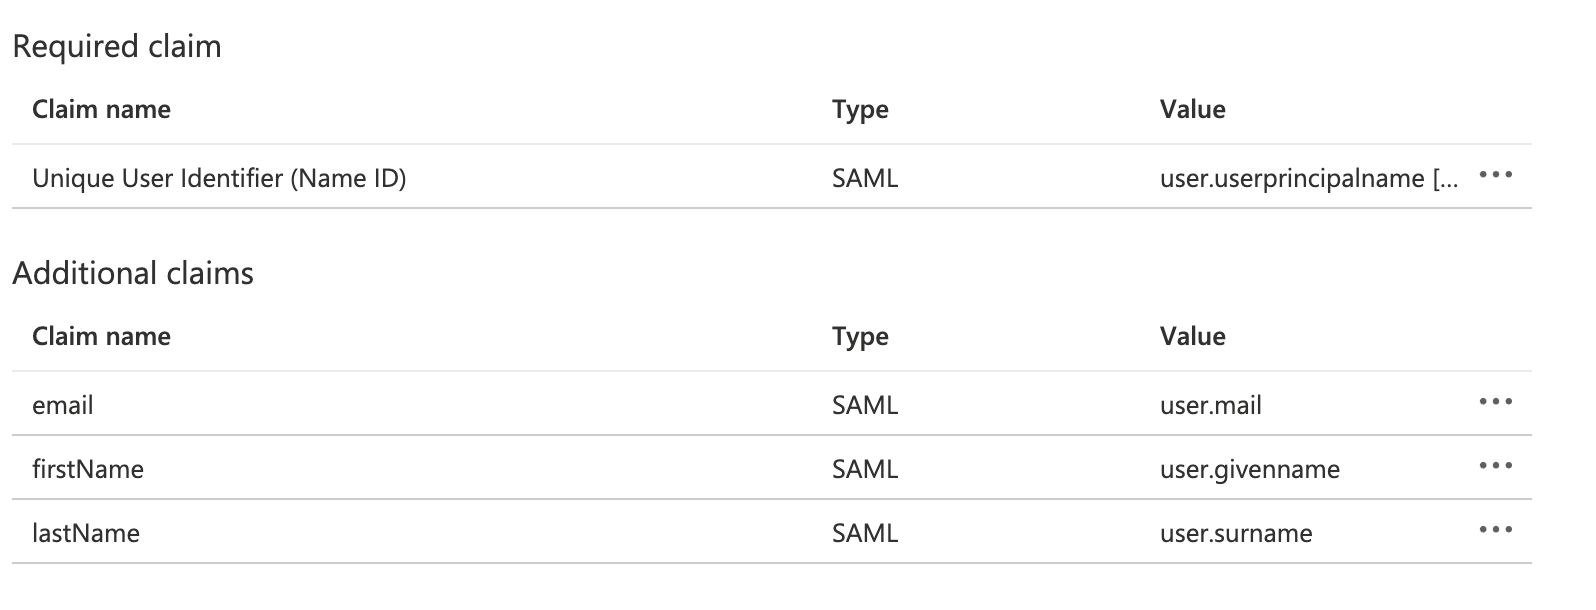
Configure the Additional Claims in Microsoft Entra ID
You must configure the additional claims or the SSO setup won't work as expected.
In the Entra ID admin center:
-
On the SSO configuration page, go to the Attributes & Claims section and select Edit.
-
On the Attributes & Claims page, go to the Additional Claims section.
-
For each claim that you need to edit, do the following:
-
Select the claim. The Manage Claim screen opens.
-
In the Name field, enter the name in the following table.
For the claim with this Value Change the Name to user.mail
or
user.principalname
(Depending on your Entra ID setup)emailuser.givennamefirstNameuser.surnamelastName -
If the Namespace field contains a URL, delete it.
infoEntra ID uses the following format for default namespaces:
http://schemas.microsoft.com/identity/claims/extn.<attributename>. -
Select Save.
-
The Attributes & Claims section should look something like this:
Download Your SAML Signing Certificate
You need a SAML signing certificate to make Entra ID an identity provider in MaintainX.
In the Entra ID admin center:
- On the SSO configuration page, navigate to SAML Certificates section.
- Locate the Download link for Certificate (Base64).
- Download the certificate to your computer.
You have to update your SAML signing certificate periodically. Starting one month before your certificate expires, MaintainX sends email reminders to your organization Administrator every seven days.
To update your certificate, download a new certificate from Entra ID and upload it to MaintainX (see Upload Your SAML Signing Certificate to MaintainX).
Upload Your SAML Signing Certificate to MaintainX
In MaintainX:
- Open the Single Sign-On Configuration dialog.
- Navigate to the Identity Provider Configuration section.
- Select Certificate > Upload.
- Select the certificate you downloaded from Entra ID earlier, and submit it.
Copy Your IdP Configuration Settings From Entra ID to MaintainX
In the Entra ID admin center:
-
On the SSO configuration page, navigate to the Set up <APPLICATION NAME> section.
-
Locate the URLs in the following fields. You will need to copy them into MaintainX:
- Login URL
- Microsoft Entra ID Identifier
In MaintainX:
-
Open the Single Sign-On Configuration dialog.
-
Navigate to the Identity Provider Configuration settings section:
-
Enter the following values from the Entra ID admin console:
Copy this value from Entra ID To these fields in MaintainX Login URL
Starts with:https://login.microsoftonline.com/Single Sign On (SSO) URL
DestinationMicrosoft Entra Identifier
Starts with:https://sts.windows.net/Issuer URI -
Select Update.
Test the SSO Configuration in Entra ID
In the Entra ID admin center:
- On the SSO configuration page, navigate to the Test single sign-on with <APPLICATION NAME> section.
- Select Test.
- When Entra ID prompts you, log in to your application.
Next Steps
After you configure SSO, there are a few more things you need to do to finish the setup.
- Test your SSO setup in MaintainX.
- Map your domains.
- Set the default account type for new users.
- Migrate your existing users to SSO.
- Enable SSO for your other MaintainX organizations.
For more information, see Set Up SSO.
When a new user who doesn't have a MaintainX account logs into your organization using SSO, MaintainX creates an account automatically. You can specify which user role to assign by default. You can't specify different MaintainX roles for new users based on Active Directory groups. But you can change a new user's role from the default once their MaintainX account is active.
For more information, see: