View and Filter Work Requests
| Platform: | AvailableWebAvailableMobile |
|---|---|
| Plan Type: | AvailableBasicAvailableEssentialAvailablePremiumAvailableEnterprise |
| User Type: | AvailableRequesterNot availableFull UserAvailableAdministrator |
The Requests module is where Requester users and Administrators view and manage work requests.
- Requester users can create new requests, and see the status of their requests.
- Administrators can view, approve, and decline requests.
To access the Requests module:
- Web
- Mobile
From the sidebar, select Requests.
If you’re a Requester user:
- From the bottom navigation bar, select Requests.
If you’re an Administrator:
- From the bottom navigation bar, select More to display more features and options.
- From the Product Features section, select Requests.
The Requests Module Interface
View Work Requests in the Web Application
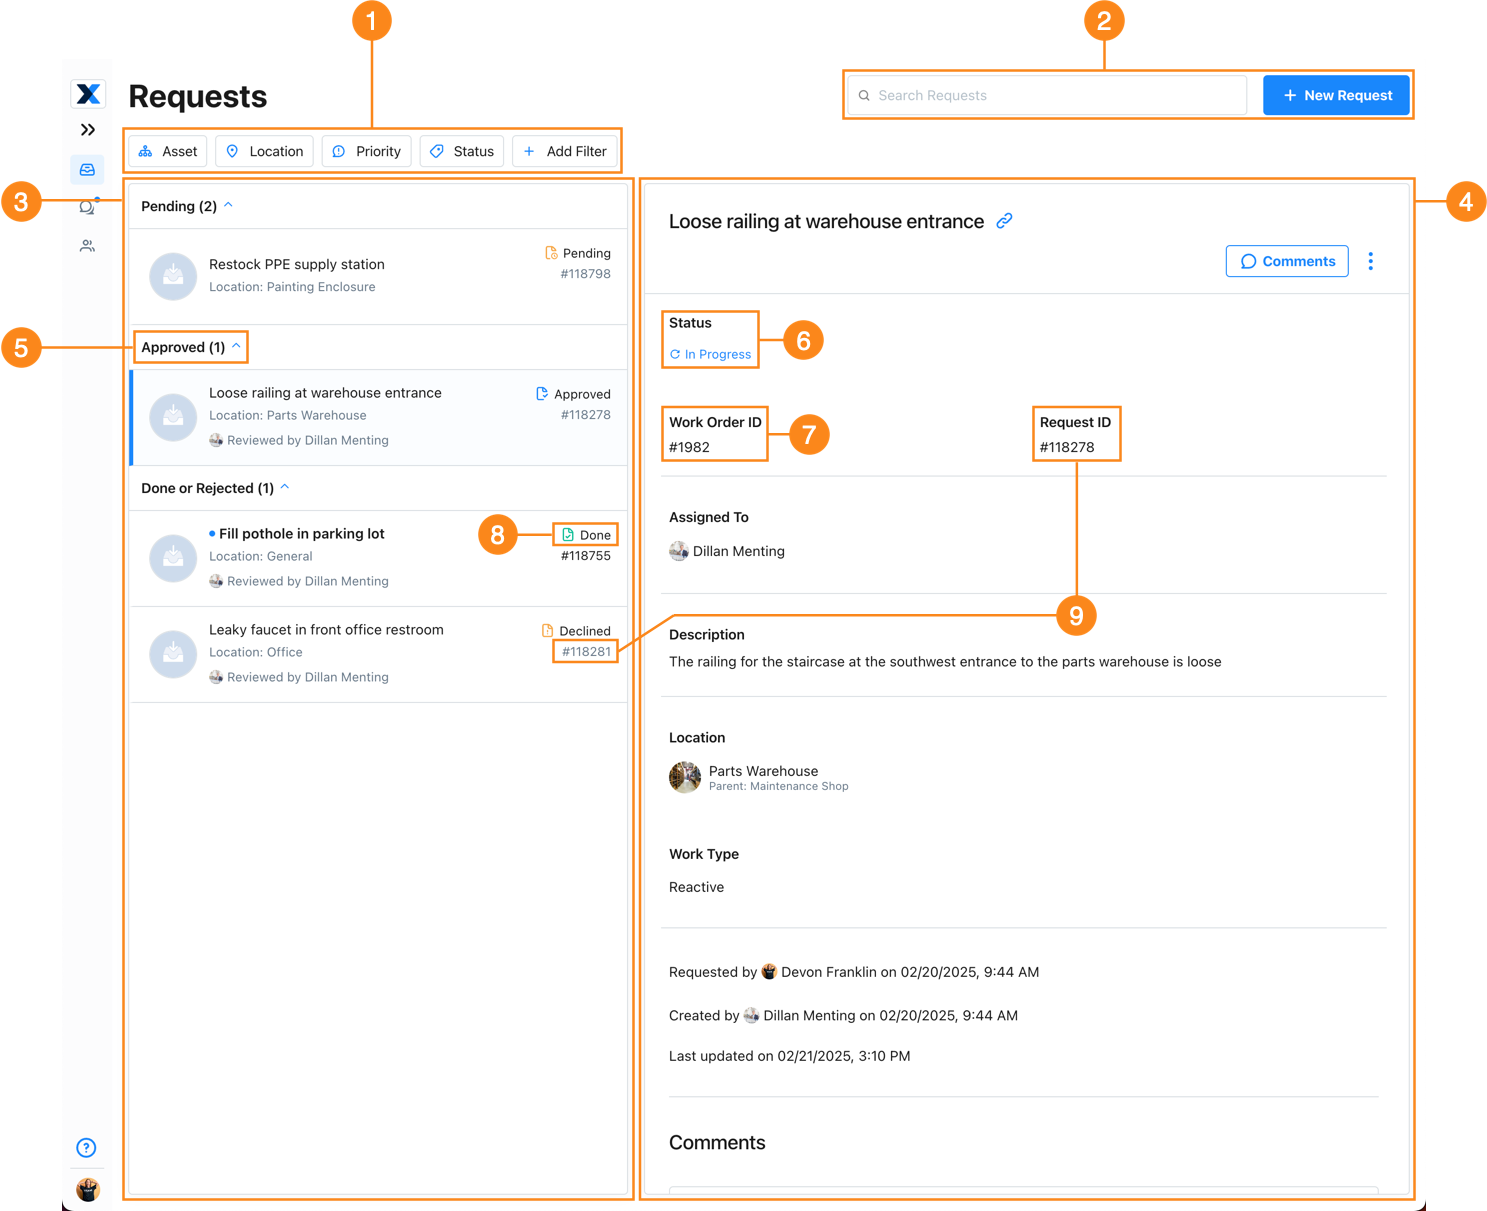
| Section | Description | |
|---|---|---|
| 1 | Filters | Control which requests are displayed in the list pane. For details, see Filter Work Requests. |
| 2 | Search | Search for work requests by keyword, request ID, or work order ID for approved requests. The list view updates as you type. |
| 3 | List Pane | Lists all of the requests that the current user is allowed to see. Administrators can see all requests for the organization. Requester users can see requests that they created, and requests assigned to teams that they belong to. Select a request to see its details in the details pane. |
| 4 | Details Pane | Displays the details for the currently selected request. When the request is approved, information about the corresponding work order appears here too. |
| 5 | Grouping | Work requests are grouped by status or by assignment if your organization has request routing enabled. For details, see Work Request Status and Grouping |
| 6 | Work Request/Work Order Status | The status of the work request. If the work request is approved, the status of the corresponding work order appears instead. |
| 7 | Work Order ID | If the work request is approved, the ID of the corresponding work order appears. |
| 8 | Work Request Status | The status of the work request. For details, see Work Request Status and Grouping. |
| 9 | Work Request ID | The ID of the work request. It appears in both the list pane and the details pane. |
View Work Requests in the Mobile Application
Request List Screen

| Section | Description | |
|---|---|---|
| 1 | Search | Search for work requests by keyword, request ID, or work order ID for approved requests. The list view updates as you type. |
| 2 | List | Lists all of the requests that the current user is allowed to see. Administrators can see all requests for the organization. Requester users can see requests that they created, and requests assigned to teams that they belong to. Select a request to see its details in the details pane. |
Request Details Screen
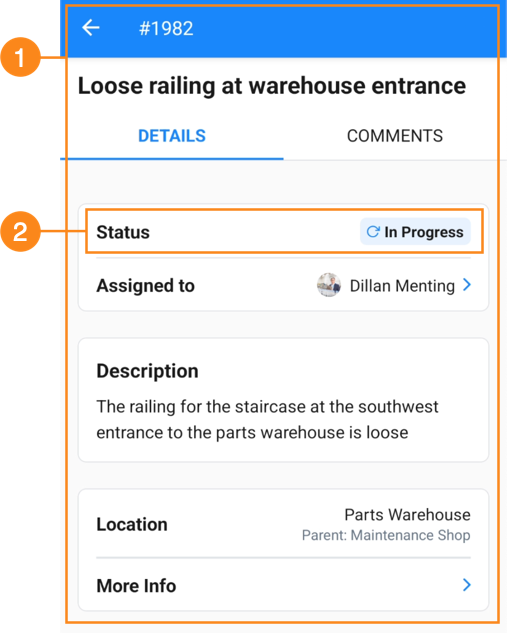
| Section | Description | |
|---|---|---|
| 1 | Details | Displays the details for the currently selected request. When the request is approved, information about the corresponding work order appears here too. |
| 2 | Status | The status of the request. For details, see Work Request Status and Grouping. |
Work Request Status and Grouping
Every work request has a status. You can see the status in the work request list and the work request details. By default, MaintainX® groups requests in the work requests list by status.
Work requests can have the following statuses:
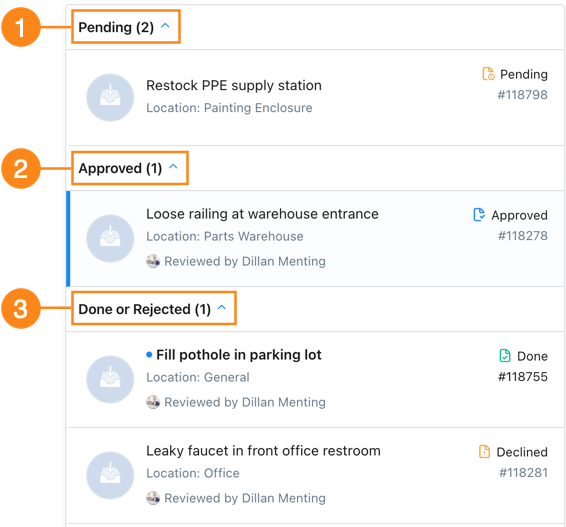
| Status | Description | |
|---|---|---|
| 1 | Pending | The request has not been reviewed by an Administrator. |
| 2 | Approved | An Administrator approved the request and created a work order. The work order ID appears in the |
| 3 | Declined | An Administrator declined the request. |
| 3 | Done | An Administrator approved the request and created a work order, and the work order is complete. |
Work Request Grouping with Request Routing
If your organization uses request routing, MaintainX groups work requests according to assignment instead of status:
| Assignment | Description |
|---|---|
| Not Assigned | The request is not assigned to a specific team. Any Administrator can see and process it. |
| Assigned to My Teams | The request is assigned to a team that you are a member of. |
| Assigned to other Teams | The request is assigned to a team that you are not a member of. |
You can still see the status of each request in the work request list (only on mobile) and the work request details.
Request routing allows Requesters to assign work requests to specific teams, who can approve or decline them. For details, see Set up Request Routing.
Filter Work Requests
Filters control which requests appear in the work requests list. For example, apply the Asset filter to only show work requests associated with specific assets. MaintainX groups filtered lists of work requests the same way it groups the complete list (see Work Request Status and Grouping.
To filter work requests:
- Web
- Mobile
- In the Requests module, select a filter. A list of filter criteria opens.
- From the filter criteria, select the criteria to filter for.
- Repeat for each additional filter you want to apply.
-
Do one of the following:
- Requesters: From the bottom navigation bar, select My Requests.
- Administrators: From the bottom navigation bar, select More to display more features and options. Then, from the Product Features section, select Requests.
-
Select the (Add Filter) icon.
infoIf there are filters active already, a small dot appears on the filter icon .
-
Select the filter you want to apply.
-
On the filter details screen, set the filter criteria and conditions.
-
Select DONE.
-
On the Add Filter screen, select Apply.