Create a Root Cause Analysis Report
| Platform: | AvailableWebAvailableMobile |
|---|---|
| Plan Type: | Not availableBasicNot availableEssentialNot availablePremiumAvailableEnterprise |
| User Type: | Not availableRequesterAvailableFull UserAvailableAdministrator |
This article explains how to create root cause analysis reports in MaintainX® to document asset failures.
Requirements
To create root cause analysis reports, you must have root cause analysis categories and options set up for your organization. For more information, see Set Up Root Cause Analysis Categories.
Workflow Overview
To create a root cause analysis report, do the following:
- Start a Root Cause Analysis Report: Create a new report when you change an asset's status, or from scratch.
- Link a Work Order: Link the work order that triggered the root cause analysis to the report so you can return to the work order for more details about the asset failure.
- Set the Incident Period and Repair Time: Set start and end dates for the incident, and optionally, the amount of time it took to complete the repair.
- Document the Asset Failure: Use your root cause analysis categories and options to document why the asset failed using standard, consistent terms.
- Add Notes: Notes fill in important details that structured categories and options don't capture.
- Save the Report.
Start a Root Cause Analysis Report
You can start a new root cause analysis report by changing an asset's status, or you can create one from scratch from an asset or a work order.
Create a Report When You Change an Asset's Status
- Web
- Mobile
-
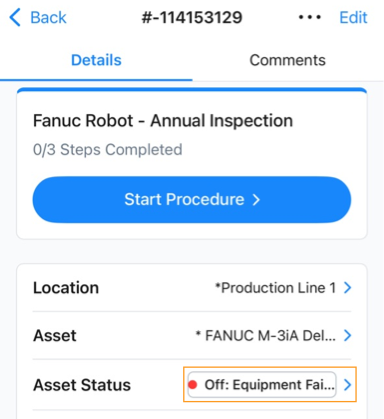
Change the status of the asset that you want to start a root cause analysis report for. You can change the status from the following places:
-
From the asset details page: On the Insights tab, navigate to the Status and Meter Readings section and select a new status from the drop-down.
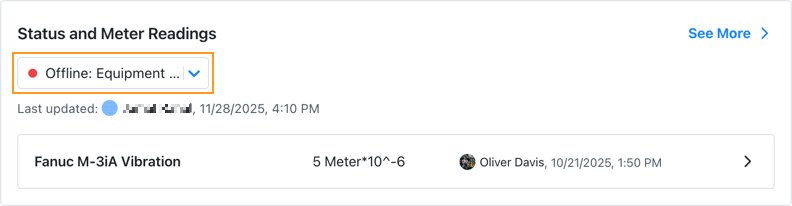
Changing asset status from the asset details -
From a work order: in the work order details, navigate to the Asset section and select a new status from the drop-down.
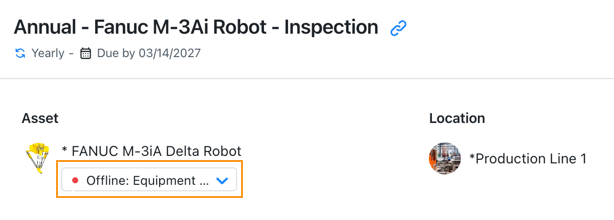
Changing asset status from a work order
The Update Asset Status dialog opens.
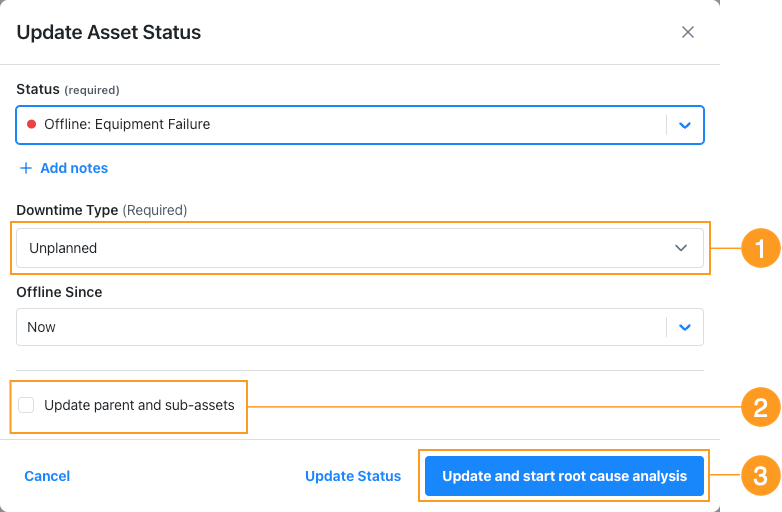
The Update Asset Status dialog -
-
If you selected an Offline status, choose a Downtime Type 1.
-
(Optional) Fill in the other fields as needed.
If the asset is part of an asset hierarchy, you can use the Update parent and sub-assets options 2 apply the status update to more than one asset in the hierarchy. In that case, the root cause analysis report will include all the selected assets. For details, see Root Cause Analysis Reports for Asset Hierarchies.
-
Select Update and start root cause analysis 3.
-
The Root Cause Analysis page opens.
-
(Optional) Select Add Work Order to link a work order to the report. For details see Link a Work Order.
-
Enter the Start and End dates for the Incident Period and, optionally, add the Repair Time. If the work order includes time tracking, that information is auto filled in the Repair Time section. For details, see Set the Incident Period and Repair Time.
-
Document one or more problems using the root cause analysis categories and options. For details, see Document the Asset Failure.
-
Change the status of the asset that you want to start a root cause analysis report for. You can change the status from the following places:
-
From the asset details screen: On the Insights tab, navigate to the Status section and select a new status.
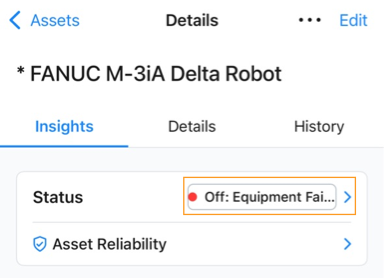
Changing asset status from the asset details -
From a work order: in the work order details, navigate to the Asset section and select a new status from the drop-down.
Changing asset status from a work order
The Update Asset Status screen opens.
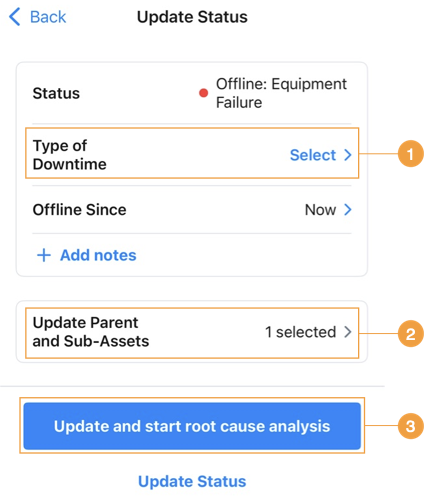
The Update Status screen for assets -
-
If you selected an Offline status, choose a Type of Downtime 1.
-
(Optional) Fill in the other fields as needed.
If the asset is part of an asset hierarchy, you can use the Update parent and sub-assets options 2 apply the status update to more than one asset in the hierarchy. In that case, the root cause analysis report will include all the selected assets. For details, see Root Cause Analysis Reports for Asset Hierarchies.
-
Select Update and start root cause analysis 3.
-
The Root Cause Analysis screen opens.
-
(Optional) Select Add a Work Order to link a work order to the report. For details see Link a Work Order.
-
Enter the Start and End dates for the Incident Period and, optionally, add the Repair Time. If the work order includes time tracking, that information is auto filled in the Repair Time section. For details, see Set the Incident Period and Repair Time.
-
Document one or more problems using the root cause analysis categories and options. For details, see Document the Asset Failure.
Create a Report from Scratch
Create a root cause analysis report from an asset without changing the asset's status.
- Web
- Mobile
- From the sidebar, select Assets.
- Select an asset to view its details.
- On the Insights tab of the asset details, navigate to the Root Cause Analysis section and select Create New.
- (Optional) Select Add a Work Order to link a work order to the report. For details see Link a Work Order.
- Enter the Start and End dates for the Incident Period and, optionally, add the Repair Time. If the work order includes time tracking, that information is auto filled in the Repair Time section. For details, see Set the Incident Period and Repair Time.
- Document one or more problems using the root cause analysis categories and options. For details, see Document the Asset Failure.
- From the bottom navigation bar, select Assets.
- Select an asset to view its details.
- On the Insights tab of the asset details, navigate to the Root Cause Analysis section and select Create New.
- (Optional) Select Add a Work Order to link a work order to the report. For details see Link a Work Order.
- Enter the Start and End dates for the Incident Period and, optionally, add the Repair Time. If the work order includes time tracking, that information is auto filled in the Repair Time section. For details, see Set the Incident Period and Repair Time.
- Document one or more problems using the root cause analysis categories and options. For details, see Document the Asset Failure.
Create a Report from a Work Order
Create a root cause analysis report from a work order without changing the asset's status. Creating a report from the work order automatically links that work order to the report.
To create a report from a work order, you have to associate an asset with the work order. If there is no asset, the Root Cause Analysis section doesn't appear.
- Web
- Mobile
- From the sidebar, select Work Orders.
- Select a work order to view its details.
- Navigate to the Root Cause Analysis section and select Create New. The Root Cause Analysis page opens.
- Since the report is started from a work order, it automatically shows as a Linked Work Order.
- Enter the Start and End dates for the Incident Period and, optionally, add the Repair Time. If the work order includes time tracking, that information is auto filled in the Repair Time section. For details, see Set the Incident Period and Repair Time.
- Document one or more problems using the root cause analysis categories and options. For details, see Document the Asset Failure.
- From the bottom navigation bar, select Work Orders.
- Select a work order to view its details.
- Scroll down to the Root Cause Analysis section and select Create New.
- Since the report is started from a work order, it automatically shows as a Linked Work Order.
- Enter the Start and End dates for the Incident Period and, optionally, add the Repair Time. If the work order includes time tracking, that information is auto filled in the Repair Time section. For details, see Set the Incident Period and Repair Time.
- Document one or more problems using the root cause analysis categories and options. For details, see Document the Asset Failure.
Link a Work Order
Link a work order to a root cause analysis report. A report can have one linked work order at a time. If you started the root cause analysis from a work order, that work order is automatically linked to the report.
- Web
- Mobile
- Create a new root cause analysis report, or open an existing report.
- In the Linked Work Order section, select Add Work Order.
- On the Link Work Order page, select from the list of Recent Work Orders, or enter a work order name, ID, or keyword in the Search Work Order field.
- (Optional) Apply available filters or select Add filter to narrow your search.
- Select the work order you want to link from the list. You can only select one work order.
- Select Link Work Order.
- The work order appears in the Linked Work Order section of the report.
- Create a new root cause analysis report, or open an existing one.
- In the Linked Work Order section, select Add Work Order.
- On the Link Work Order screen, select from a default list of your recent work orders, or enter a work order name, ID, or keyword in the Search field.
- (Optional) Select Edit filters and use filters to narrow results by Asset, Status, Assigned to or Location. When you've chosen your filters, select Apply.
- Select the work order you want to link, then select Done. You can only select one work order.
- The work order appears in the Linked Work Order section of the report.
Unlink a Work Order
If you want to link a different work order, or no longer want a work order associated with the report, you can unlink it.
Unlinking a work order doesn't delete the work order or the root cause analysis report, it removes the association between the report and the work order. A system message is added to the work order's activity history when you add or remove a link.
To unlink a work order:
- Web
- Mobile
- Open the root cause analysis report.
- In the Linked Work Order section, select the (close) icon next to the work order.
- When prompted, confirm that you want to Unlink.
- Open the root cause analysis report.
- In the Linked Work Order section, select Unlink next to the work order.
- When prompted, confirm that you want to Unlink.
Set the Incident Period and Repair Time
A root cause analysis report has a required Incident Period section and an optional Repair Time section.
-
Incident Period is the total time period of the incident you're documenting in the root cause analysis report.
The incident period Start and End date fields are both required.
-
Repair Time is the portion of the incident period that technicians spent working on the asset. Normally, this is number of hours that the team logged for repairs (i.e., wrench time).
Repair Time is optional. To add it manually to the report, select Add repair time. Then fill in the Hours and Minutes fields.
tipAlthough Repair Time isn't required, if you include it consistently, it can be useful for seeing how much of your overall asset downtime is actually spent fixing assets.
A big difference between the total durations of incident periods and repair times might be a sign that there are inefficiencies or scheduling problems in your repair process that you need to address.
Linked Work Orders and Repair Time
If you link a work order to the report, the Repair Time field is automatically filled with the total labor hours logged on that work order. The auto fill only happens when the Repair Time field is empty and won't overwrite a value you have already entered. You can edit the auto filled value in the report at any time. However, if you update the repair time from the linked work order, it won't automatically update in the report.
Document the Asset Failure
After you create a new root cause analysis report, you can document the asset failure using the root cause analysis categories and options defined for your organization.
A root cause analysis consists of one or more problems that led to the asset failure. Each problem has a Problem Type, Failure, Cause, and one or more Actions.
| Option | Description |
|---|---|
| Problem Types | The kind of problem, but not the specific point of failure (e.g., component wear, vibration, temperature extremes). |
| Failures | The specific component or system that failed (what broke) |
| Causes | The underlying reason or condition that led to the failure (why it broke) |
| Actions | The work you do to repair the asset and get it back online (how it was fixed). |
If you add more than one category to a report, problems are grouped by category.
You can only choose from the categories and options that are already configured for your organization. For more information about managing categories and options, see Set Up Root Cause Analysis Categories.
To add problem descriptions to a root cause analysis report:
- Web
- Mobile
-
Create a new root cause analysis report or open an existing draft.
-
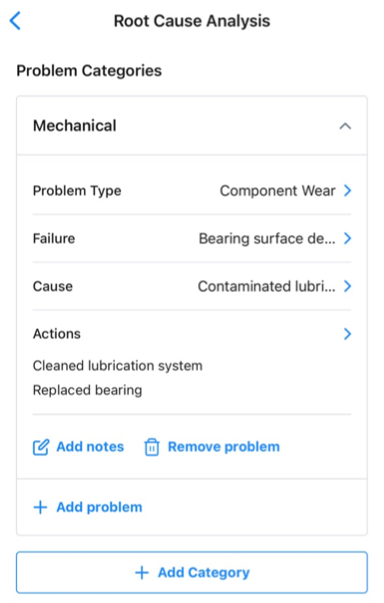
On the Root Cause Analysis page, select a problem category from the Problem Categories list.

Selecting a problem category for root cause analysis -
Select a Problem Type, Failure, Cause, and one or more Actions.
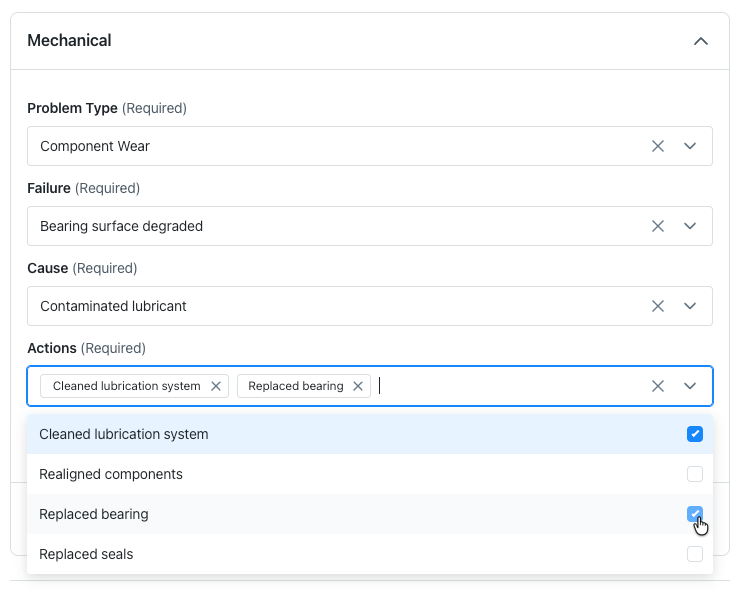
Documenting problem details in a root cause analysis report -
(Optional) To add another problem in the same category, select Add Problem.
-
(Optional) To add another category, select it from the Add Problem Category list. Then add one or more problems for the new category.

Adding a new problem category to a root cause analysis report
-
Create a new root cause analysis report or open an existing draft.
-
On the Root Cause Analysis screen, select a problem category from the Problem Categories list.
Selecting a problem category for root cause analysis -
Select a Problem Type, Failure, Cause, and one or more Actions.
Documenting problem details in a root cause analysis report -
(Optional) To add another problem in the same category, select Add Problem.
-
(Optional) To add another category, select Add Category, and select a category from the add category screen. Then add one or more problems for the new category.
Add Notes (Optional)
Adding notes to your root cause analysis reports help you record important details about an asset failure that are hard to capture with predefined categories and options. Notes complement the structured data to provide a comprehensive description of an incident.
- To add notes for a specific problem in a report, select Add Notes.
- Use the Notes field at the end of the form to add general notes for the whole report.
Save the Report
While you're working on a root cause analysis report, select Save Draft any time to save a snapshot of your work in progress.
When the report is finished, select Save to save the final version.
You can save a draft even if it's missing required information, but to save the final version of the report, you must complete all required fields.
Finish a Draft Report
If you save a root cause analysis as a draft, you can edit it to continue or complete it.
- Web
- Mobile
To edit a draft report:
-
From the Assets module, select the asset whose draft report you want to edit to view its details.
-
On the Insights tab of the asset details, locate the draft report you want to edit and select Finish Report to open it.
-
Edit the report as needed:
-
Select Save Draft to save your changes, or Save if the report is complete.
To edit a draft report:
-
From the Assets module, select the asset whose draft report you want to edit to view its details.
-
On the Insights tab of the asset details, locate the draft report you want to edit and select the (right chevron) icon to open it.
-
Edit the report as needed:
-
Select Save Draft to save your changes, or Save if the report is complete.
Root Cause Analysis Reports for Asset Hierarchies
If an asset is part of an asset hierarchy (see About Asset Hierarchies), a failure might affect its parent asset or sub-assets.
To include all the affected assets in the root cause analysis report for the incident, you have to create the report when you change the asset's status (see Create a Report When You Change an Asset's Status).
In the Update Asset Status (web) / Update Status (mobile) options, select the Update parent and sub-assets option to choose the assets in the hierarchy that you want to apply the status change to.

When you fill out the report, the title includes a link to a list of affected assets.
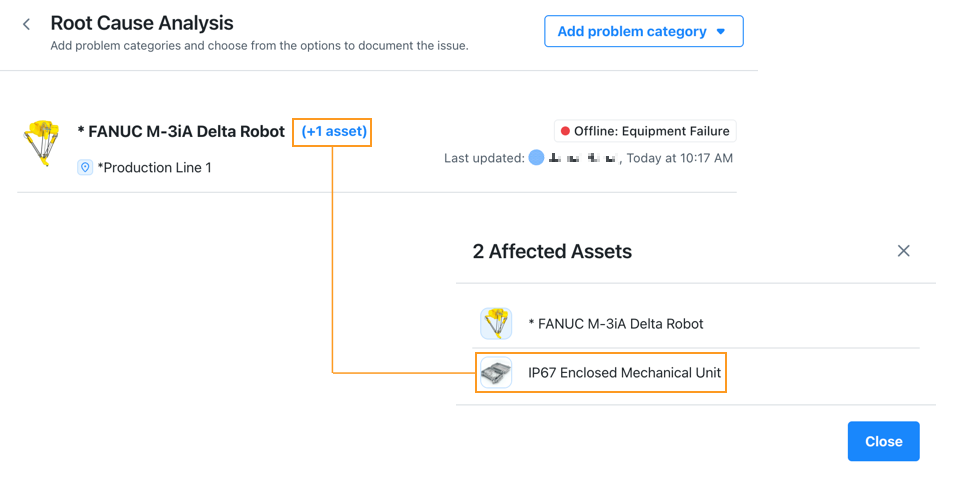
The published report lists the affected assets.

An asset's root cause analysis history lists all the reports where it's either the main asset or one of the affected assets.