Complete a Work Order
| Platform: | AvailableWebAvailableMobile |
|---|---|
| Plan Type: | AvailableBasicAvailableEssentialAvailablePremiumAvailableEnterprise |
| User Type: | Not availableRequesterAvailableFull UserAvailableAdministrator |
This article explains how to complete a work order. For information on how to create a work order, see Create a Work Order.
If you're working in an environment with limited or no internet access, use offline mode. In offline mode, MaintainX® updates on-device copies of your work orders and syncs your changes the next time you connect. For details, see Working Offline.
Complete a Work Order
- Web
- Mobile
-
From the sidebar, select Work Orders.
-
Locate the work order you want to work on.
-
Select the status of the work order. The status can be:
Status Definition Open Default status when you create a work order. On Hold Select this status to pause work on the work order. In Progress Select this status to indicate you're working on the work order. Done Select this status when you complete the work order. noteA work order status updates automatically to In Progress when a user starts work on an Open work order and updates steps in a procedure in the work order.
-
Execute the steps for the task on the work order.
-
When the work order is complete, select Mark as Done.
-
From the bottom navigation bar, select Work Orders.
-
Switch between the Calendar View and the List View by selecting the icon. For more information on the different views on work orders, see View and Filter Work Orders.
-
Locate the work order you want to work on.
-
Select the status of the work order. The status can be:
Status Definition Open Default status when you create a work order. On Hold Select this status to pause work on the work order. In Progress Select this status to indicate you're working on the work order. Done Select this status when you complete the work order. noteA work order status updates automatically to In Progress when a user starts work on an Open work order and updates steps in a procedure in the work order.
-
Execute the steps for the task on the work order.
-
When the work order is complete, select Mark as Done.
Time and Cost Tracking
Available for Enterprise plans. For more information, contact your MaintainX Account Manager.
In a work order, you can track time and costs associated with the work performed. You can add time manually or automatically using the timer (mobile only) when a work order has an active status (Open, On Hold, or In Progress).
Tracking time and costs helps you reduce unplanned downtime by providing clear visibility into how long maintenance tasks take and where failures occur. By understanding both the duration and cost of tasks, organizations can optimize scheduling, allocate resources more strategically, and prevent small issues from becoming major disruptions.
Tracking Time
Tracking time in a work order automatically adds labor costs based on the user’s default hourly rate, which appears as the default value for Hourly Rate (Optional) when adding time. To override the default hourly rate, enter a new value. If you don’t want to associate labor costs with added time, enter 0 in this field.
For example, a technician at a manufacturing plant could use their mobile device to start and stop the timer in a work order while they perform the on-site work. Administrators and Full Users can also manually add tracked time to a work order. For more information on user roles and permissions, see User Roles and Permissions.
Tracking Costs
Tracking costs in a work order is helpful when you incur incidental costs. For example, a technician could track transportation costs related to traveling to a work site. When tracking costs, you can also assign a cost category to segment costs. In the previous example, you can assign this cost to a “Travel” cost category.
In addition to tracked time and costs, work orders also display any parts added during the work. The unit costs for parts appear alongside tracked time and costs. To learn how to add a part to your parts inventory and set its unit price, see Create a Part.
Add Parts
- Web
- Mobile
-
In the work order details, navigate to the Time & Cost Tracking section.
-
Beside Parts, select Add.
-
In the Parts field, select a part and complete the required fields:
- In the Location field, select the location where the part was sourced from.
- In the Amount Used field, set the quantity of parts used.
-
Select Update. Parts are added to the work order.
-
In the work order details, navigate to the Time & Cost Tracking section.
-
Beside Parts, select Add.
-
Select a part, or select the (scan) icon if the part has a barcode.
-
Select Done.
-
Select Add Parts and complete the required fields:
- Select the location where the part was sourced from.
- In the Parts Needed field, set the quantity of parts used.
-
Select Done.
-
Select Add Parts. Parts are added to the work order.
Track Time Manually
- Web
- Mobile
-
In the work order details, navigate to the Time & Cost Tracking section.
-
Beside Time, select Add.
-
Select Add Time and complete the required fields:
- In the User field, select the user who performed the work.
- In the Hours and Minutes fields, set the amount of time spent performing the work.
- In the Type field, select the type of work being performed (e.g., Inspection).
- In the Hourly Rate (Optional) field, set the user's hourly rate, if applicable.
-
Select Add. Tracked work time is added to the work order.
-
In the work order details, navigate to the Time & Cost Tracking section.
-
Beside Time, select Add.
-
Select Add Time and complete the required fields:
-
Under Select Time Category:
- Set the type of work being performed (e.g., Inspection).
- Select Next.
-
Under Add Time Manually:
- In the Time Spent fields, set the number of hours and minutes spent performing the work.
- In the Hourly Rate (Optional) field, set the hourly rate, if applicable.
-
-
Select Done. Tracked work time is added to the work order.
Track Time Using the Timer
This feature is only available in the MaintainX mobile application.
-
In the work order details, select Start Timer. The timer starts recording work time.
-
To stop the timer, select Pause. The work time recorded so far is added to the work order.
- To exit the timer, select Stop.
- To record additional time, select Resume.
The timer is a particularly useful feature for work occurring over multiple days. The Stop and Resume functionality is designed to allow for pausing and resuming work as needed, and multiple work order timers can run simultaneously.
Track Other Costs
- Web
- Mobile
-
In the work order details, navigate to the Time & Cost Tracking section.
-
Beside Other Costs, select Add.
-
Select Add Cost and complete the required fields:
- In the User field, select the user who performed the work.
- In the Cost field, set the cost associated with the work performed.
- In the Description (Optional) field, enter the description for the costs incurred, if applicable.
- In the Cost Category field, select the cost category associated with the work performed (e.g., Labor).
- Select the Add Pictures/Files field to attach pictures or files to the cost tracking, if applicable (e.g., a receipt).
-
Select Add. The tracked cost is added to the work order.
-
In the work order details, navigate to the Time & Cost Tracking section.
-
Beside Other Costs, select Add.
-
Under Select User, set the user who performed the work.
-
Under Select Cost Category, set the cost category associated with the work performed (e.g., Labor), then select Next.
-
Under Add Cost, set the cost associated with the work performed.
- In the Description (Optional) field, enter the description for the costs incurred, if applicable.
- Select the Add Pictures/Files field to attach pictures or files to the cost entry, if applicable (e.g., a receipt).
-
-
Select Done. The tracked cost is added to the work order.
Work Order Comments
On a work order, you can leave, edit, and delete comments. You can communicate with other users who are working on the same work order to provide updates on the work or ask questions. These comments are an efficient way to communicate information with members of the organization. You can add valuable information about maintenance plans and attach files and pictures.
You can also react to any comments left on work orders.
Leave a Comment on a Work Order
- Web
- Mobile
-
In the work order details, navigate to the Comments section.
-
Write your comment in the Write a comment field.
-
To tag a member of your organization in the comment, type @ and their name.
-
To add an attachment or photo, select the (attach) icon.
-
Select the attachment or photo you want to add.
- You can add text to go with the attachment if needed.
-
-
-
Select Send.
-
In the work order, select the Comments tab.
-
Write your comment in the Write a comment field.
-
To tag a member of your organization in the comment, type @ and their name.
-
To add one or several attachments, select the (attach) icon.
- Select the attachments. You can add text to go with the files if needed.
-
To add a photo, select the (camera).
- Select Camera if you want to take a photo using your mobile device's camera.
- Select My Photos to select one or more existing photos from your mobile device.
You can add text to go with the photos if needed.
-
To add a voice note, select the (microphone).
- Record the voice note, and select the (checkmark) icon when you're done. You can add text to go with the voice note if needed.
-
(Optional) After sending your voice note, select Get AI Transcription to transcribe what you said.
-
-
Select Send.
Edit a Work Order Comment
- Web
- Mobile
- Hover over the comment you want to edit.
- Select the (Edit) icon.
- Make the appropriate changes.
- Press the Enter/Return key.
- Long press the comment you want to edit.
- Select the (Edit) icon.
- Make the appropriate changes.
- Select Save.
Delete a Work Order Comment
- Web
- Mobile
- Hover over the comment you want to delete.
- Select the (trash) icon.
- When prompted, select Confirm to delete the comment.
- Long press the comment you want to delete.
- Select the (trash) icon.
- Select Delete Message.
- When prompted, select Yes to delete.
React to a Work Order Comment
- Web
- Mobile
- Hover over the comment you want to react to.
- Select the (Add Reaction) icon.
- Select the reaction icon you want.
- Long press the comment you want to react to.
- Select the (Add Reaction) icon.
- Select the reaction icon you want.
Complete a Parent Work Order with Sub-Work Orders
To complete a parent work order, you complete all of its sub-work orders.
-
To start the parent work order, do one of the following:
- Change its status to In Progress
- Change any sub-work order's status to In Progress, and the parent work order's status will update automatically.
-
As you change the sub-work orders' statuses, a progress bar in the parent work order shows the overall progress broken down by sub-work order status.
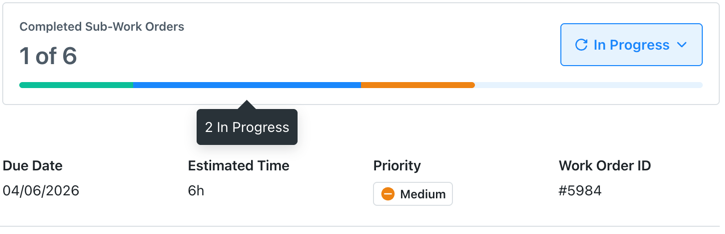
Progress tracking bar in a parent work order -
If you mark a parent work order as Done before completing all the sub-work orders, MaintainX marks the sub-work orders as Done automatically.
-
After you complete the parent work order, if you reopen a sub-work order, MaintainX reopens the parent work order as well.