Upload an Import File
| Platform: | AvailableWebNot availableMobile |
|---|---|
| Plan Type: | AvailableBasicAvailableEssentialAvailablePremiumAvailableEnterprise |
| User Type: | Not availableRequesterNot availableFull UserAvailableAdministrator |
This article explains how to upload a data file to MaintainX® to import entities such as assets or parts. After uploading a file, you need to match the columns in your file to the MaintainX fields and review any errors before completing the import.
If your MaintainX organization was set up recently, you'll also see a step to upload asset data in the Setup Center, which you can access from the sidebar.
How to Upload a Data File
Upload data files from the General settings in the MaintainX web application.
To upload a data file:
-
From the sidebar, open the Settings menu and select General.
-
On the General tab, navigate to the Import Data section and select the type of data you want to import (e.g., Assets).
The import session screen opens.
-
Do one of the following:
- Select Upload new file.
- Drag a file from your computer onto the to upload it.
-
After the file uploads, you have to do the following to complete the import:
- Review and adjust how columns in your file map to fields in MaintainX. See Match File Columns to MaintainX Fields.
- Review the import summary and troubleshoot any errors. See Review the Upload Summary.
You can also open the import session screen from the + New {ENTITY} button in the module for the type of entity you want to import.

Troubleshoot File Upload Errors
If MaintainX can't import your file, it displays error messages that can help you fix the problems preventing the import. The messages and fixes depend on the type of data you're importing.
For entity-specific troubleshooting information, see the Entity Import Guides section.
Match File Columns to MaintainX Fields
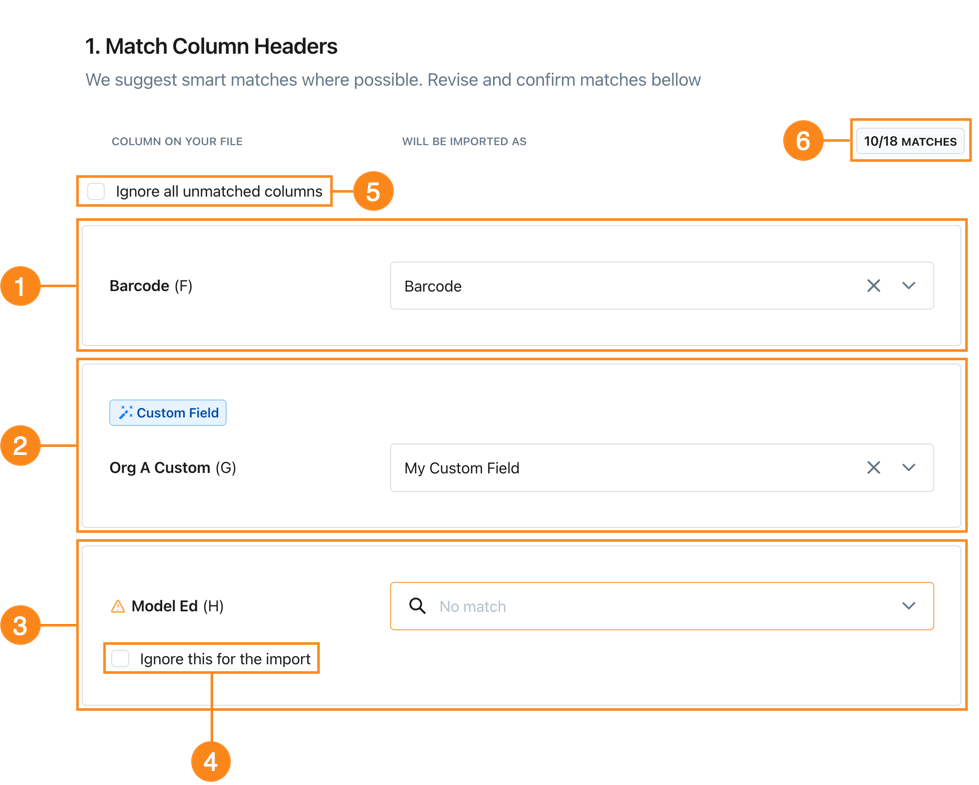
When you upload a data file, MaintainX tries to match the columns in the file to fields in the MaintainX form. On the Match Column Headers screen, you can review the results and make corrections before you import the data. You can't proceed with the import until you handle all unmatched columns.
| Description | |
|---|---|
| 1 | Matched columns show the header from your file, and the MaintainX field it's matched to. Select the (close) icon to unmatch the column header. This is useful when you want to match the column to another field, or exclude it from the import. |
| 2 | Column headers that you map to a custom field have a Custom Field badge. |
| 3 | Unmatched columns have a (warning) icon to indicate that you have to match or ignore the column before you can import the assets. Select a field or create a custom field to match the column to. Select Ignore this for the import (4) to exclude the column from the import. |
| 5 | Select Ignore all unmatched columns to exclude unmatched columns from the import. |
| 6 | The match count shows how many column headers from your file are matched to fields in the asset form. |
Create a New Custom Field for a Column
If you're importing a type of entity that supports custom fields, and you want to map a column to a field that doesn't exist in MaintainX yet, you can create a custom field on the fly.
On the Match Column Headers screen, do the following:
- Locate the section for the column you want to map to a custom field.
- In the field selector, type the name for the custom field you want to create.
- Select Create "<FIELD NAME>" as Custom field. A dialog opens.
- Set the options for the custom field.
- Select Create Custom field to create the field, and match the column to it.
On the Match Column Headers screen, a Custom Field label appears in the column's section.
Review the Upload Summary
After you finish matching file columns to MaintainX fields, the upload summary screen opens. The summary screen tells you:
- How many importable entities MaintainX detected.
- How many rows MaintainX couldn't import.
- Why MaintainX couldn't import specific rows.
Troubleshoot Data Errors
If MaintainX can't import specific rows in your import file, it displays error messages that can help you fix errors so you can reimport the data. The messages and fixes depend on the type of data you're importing.
For entity-specific troubleshooting information, see the Entity Import Guides section.
Save an Import Session as a Draft
If you leave an import session before finishing, MaintainX autosaves it as a draft. You can:
- Return to the draft anytime from the import session table to finish matching columns, reviewing errors, and completing the import.
- Discard the draft if you no longer need it.
To discard a draft:
-
From the sidebar, open the Settings menu and select General.
-
On the General tab, navigate to the Import Data section and select the type of data you want to import (e.g., Assets).
The import session screen opens.
-
In the import session table, find the session you want to discard. In that row, select Discard Draft.
A confirmation dialog box opens.
-
Select Discard Draft to confirm.
Entities aren't created in your organization until you finish the import.
Finish the Import
When you're satisfied with the results of the upload, you can import the data to create entities in your MaintainX organization.
To finish importing the data:
-
On the asset upload summary screen, select Import Items.
A confirmation dialog appears.
-
Select Create Now to finish the import.