Dynamic Asset Forms
| Platform: | AvailableWebNot availableMobile |
|---|---|
| Plan Type: | Not availableBasicNot availableEssentialNot availablePremiumAvailableEnterprise |
| User Type: | Not availableRequesterAvailableFull UserAvailableAdministrator |
This article is for Beta participants. It gives an overview of what's changing on the asset form and with asset fields, asset types and how to configure both. The feature may still change before general availability.
What's New
Asset types now control which fields appear on the asset form. When you select an asset type while creating or editing an asset, the form updates automatically to show only the fields configured for that type.
For example, an “Electrical” asset type might include fields for voltage and wattage, while a “Conveyor Belt” type might include fields for belt model and belt quantity. When you create an electrical panel asset and select the “Electrical” type, the form adjusts automatically.
Asset fields are also now reorganized into two tabs Default Fields (built-in fields like Name, Location, Criticality, and Description) and Custom Fields (fields your organization creates).
Manage Asset Types
Both Full Users and Administrators can create, edit, and delete asset types.
Create an Asset Type
- Go to Settings > Features > Assets > Set Preferences > Asset Types.
- Select + New Asset Type and enter a name.
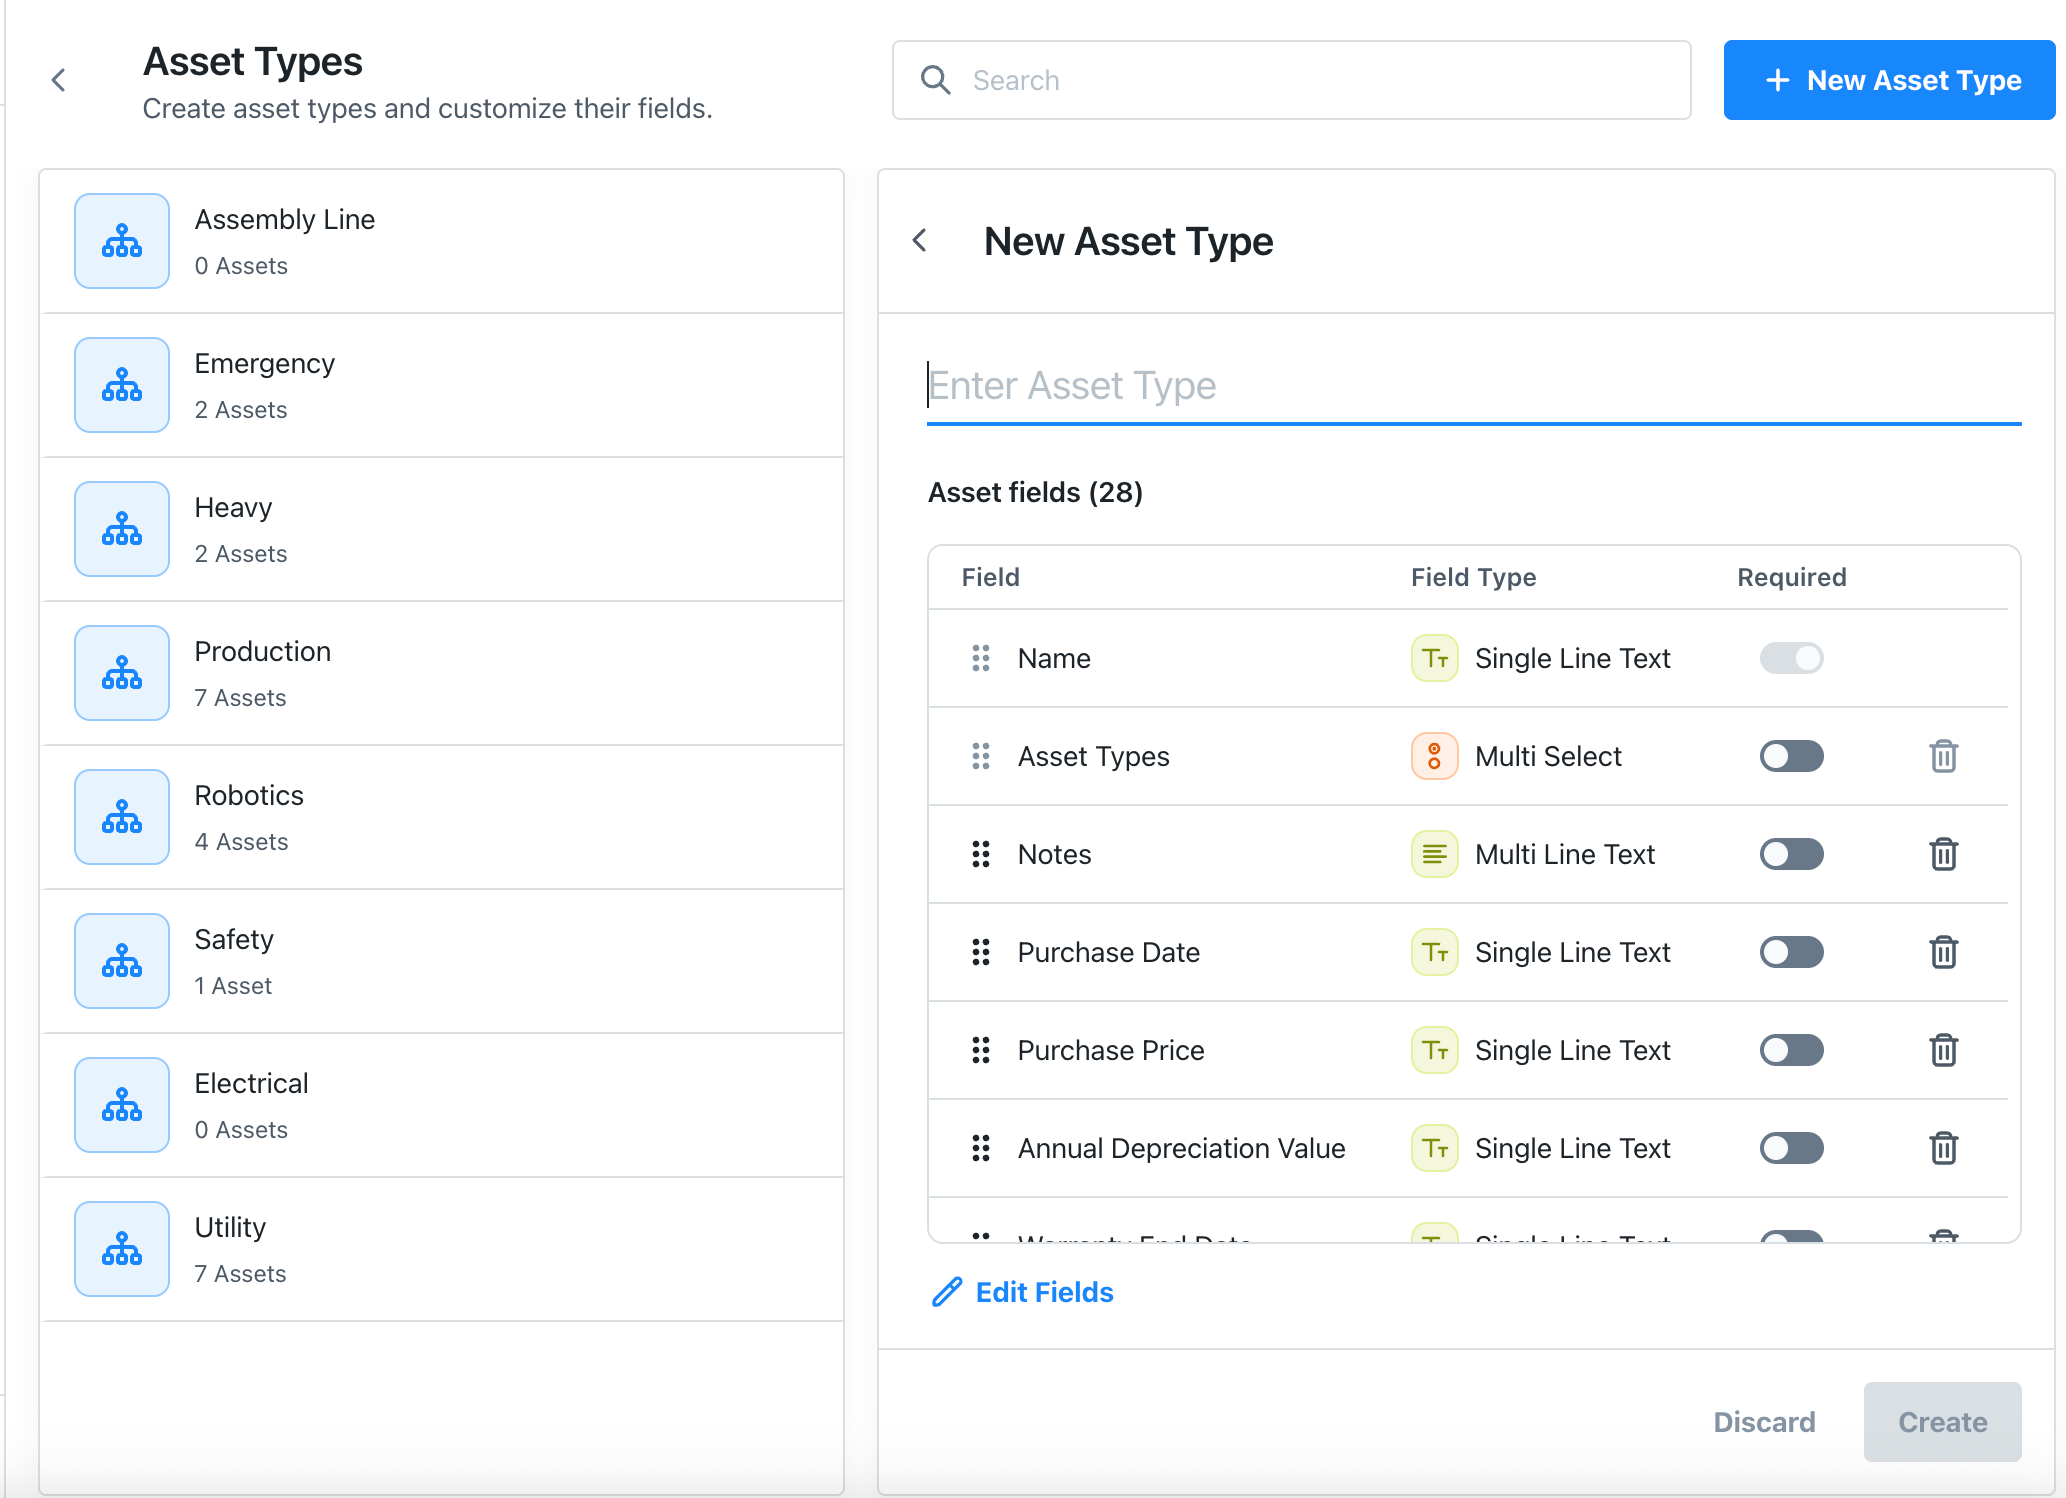
- Review the list of Asset Fields. These are the fields from the default asset form.
- Toggle Required for any fields users must fill in for this asset type.
- Select Edit Fields and check or uncheck which fields to include for this asset type.
- (Optional) Select Add custom field to create a field that doesn't exist yet. Select Add fields to confirm your selections.
- Drag the reorder icon to arrange the fields in the order you want them to appear.
- Select Create to finalize and save the new asset type.
Use a consistent naming convention for asset type labels so your team can find and filter assets efficiently. The names should be concise and organization-wide.
Edit an Asset Type
- Go to Settings > Features > Assets > Set Preferences > Asset Types.
- Select the asset type you want to edit, then select Edit.
- To add or remove fields:
- Select Edit Fields and make your changes.
- Select Add fields to confirm.
- To add a new custom field:
- Select Add custom field in the Edit Fields panel.
- Enter a label and type and select Add.
- Update required toggles or field order as needed.
- Select Save.
How the Asset Form Behaves
After configuring fields for an asset type, the form updates to show only those configured fields when you select that asset type while creating or editing an asset.
You can assign more than one asset type to a single asset. When multiple types are selected, fields shared across those types appear together at the top of the form, and fields specific to each type appear below in labeled sections (for example, “Electrical Details” or “Conveyor Belt Details”).
There are a couple of things to note when combining asset types:
- For fields shared across all the selected types, requiredness takes priority. If a field is required for at least one type, it appears as required on the combined form, even if it's optional for the others.
- Labeled sections follow the order you selected the asset types in, so if you want Conveyor Belt Details to appear after Electrical Details, select Electrical first, then Conveyor Belt in the Asset Types field.
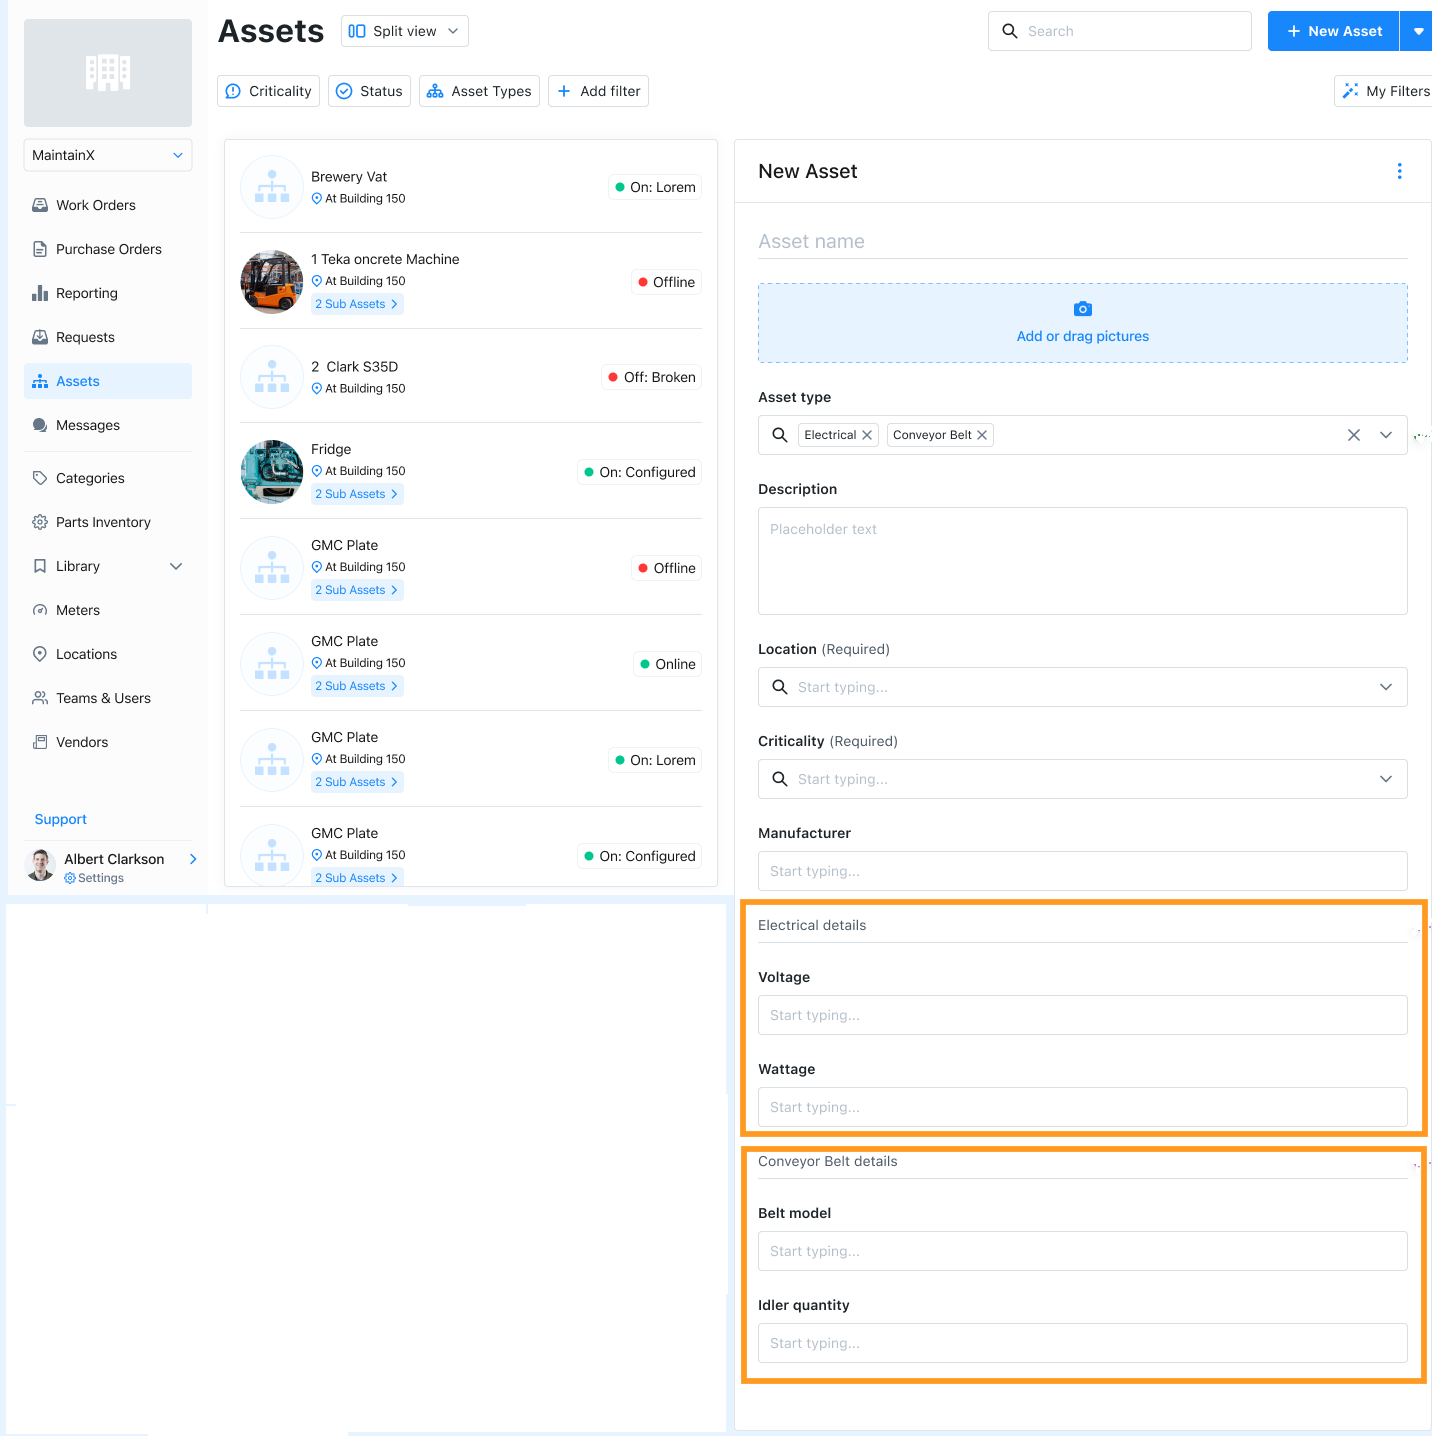
If your organization has asset types configured with custom fields, the form updates automatically when you select an asset type on the Create Asset page. Fields specific to that type appear, and fields that aren't relevant are hidden.
Configure Asset Fields
The Asset Fields setting controls which fields are available on the asset form. Fields are organized into two tabs, Default Fields and Custom Fields. The tabs are accessed from Settings > Features > Assets > Set Preferences > Asset Fields.
Default Fields
The Default Fields tab lists the built-in fields that appear on every asset form, regardless of asset type (for example, Name, Location, Criticality, and Description).
- Select the Default Fields tab.
- Find the field you want to configure and select its Settings dropdown.
- Choose from the following:
- Required: Users must fill in the field.
- Optional: Users can create the asset even if the field isn't filled in.
- Hidden: The field doesn't appear in the asset form.
- (Optional) Repeat for any other fields you want to update.
- Select Apply updates to save.
- (Optional) Select Discard to undo changes before saving.
Only Description, Depreciation, Vendors, and Serial Number can be set to Hidden. All other default fields must stay visible.
Custom Fields
The Custom Fields tab lists the additional fields your organization has created. Custom fields appear as a list below the default fields, and you can reorder them.
- Add an existing field: Select + Add custom field, choose from the available fields, and select Add field(s).
- Create a new custom field: Select + Add custom field > New Custom Field, enter a label and field type, and select Add.
- Edit a field: Select the (Edit) icon next to the field, update the label or type, and select Update.
- Make a field required: Toggle Required next to the field.
- Reorder fields: Drag the reorder icon to move a field up or down.
- Hide a field: Select Delete next to the field. This removes it from the form.
Custom field changes aren't applied to the asset form until you select Apply updates. You can switch between the Default Fields and Custom Fields tabs without losing your changes, and selecting Apply updates on either tab saves changes for both. However, if you navigate away to another page before applying, you're prompted to discard your changes.