Manage Parts in Multiple Locations
| Platform: | AvailableWebAvailableMobile |
|---|---|
| Plan Type: | Not availableBasicNot availableEssentialNot availablePremiumAvailableEnterprise |
| User Type: | Not availableRequesterAvailableFull UserAvailableAdministrator |
If your organization includes multi-location parts, you can assign more than one location to a part, and specify the available quantity in each location. Multi-location parts help you track inventory more precisely. You can see and use inventory from each location and the total inventory across locations.
View Inventory for Multi-Location Parts
Organizations with multi-location parts can see part quantities broken down by location in several parts inventory views.
In the Part Details Page
The part details page shows overall quantity information and also includes a breakdown of inventory by location.
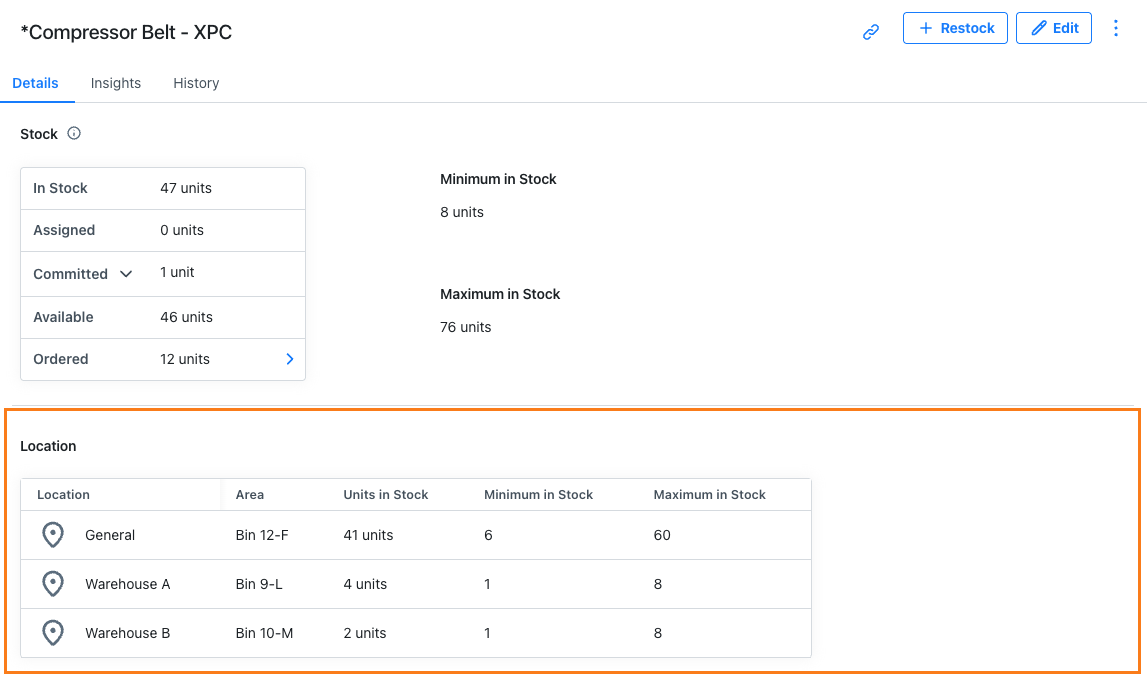
For each location assigned to the part, you can see:
| Field | Description |
|---|---|
| Area | The precise area where the part is located. For example, in Warehouse A, the part can be found in Bin 9-L. |
| Available Quantity | The number of units you have in stock at the location. This is different from the overall Available quantity, which is calculated based on the quantity in stock and the quantity currently assigned to work orders. |
| Minimum in Stock | The minimum number of units required to have in inventory at the location. If the part is set as Critical and there is an escalation team set up, the escalation team receives an alert by email when this number drops below the set minimum. |
| Maximum Quantity | The maximum number of units to keep in inventory at this location. When you create a purchase order for this part, MaintainX® uses the maximum quantity values across all locations to calculate the suggested order quantity. If Maximum in Stock isn’t set for a location, MaintainX uses the Minimum in Stock value for that location's contribution to the aggregate. |
In the Panel View (Web Application)
The Show per Location toggle in the view options toolbar of the Parts Inventory module controls how MaintainX shows part in the list pane of the Panel view.
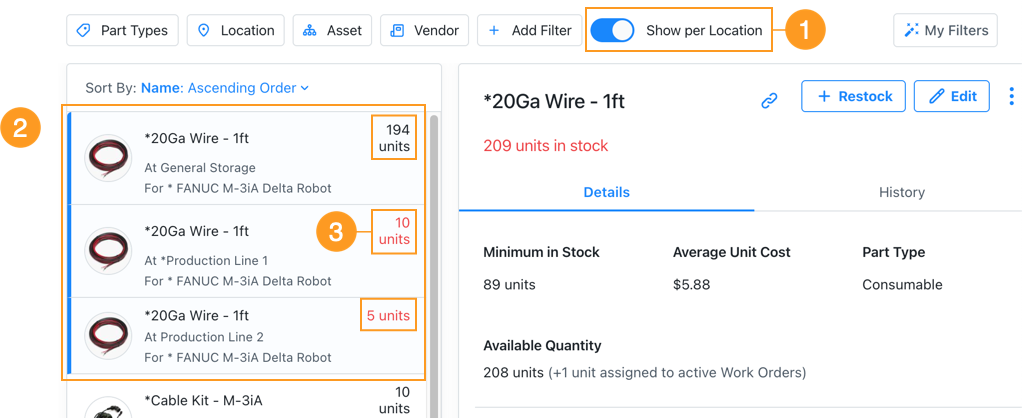
- Toggle it on 1 to show one list item per part location 2. Each item displays the quantity in stock at that location 3.
- Toggle it off to show one combined item for all part locations. The combined item shows the total quantity in stock across all locations.
In the Table View (Web Application)
The Show per Location toggle in the view options toolbar of the Parts Inventory module controls how MaintainX shows part in the Table view.

- Toggle it on 1 to show one table row per part location 2. Each row displays quantity information for that location 3.
- Toggle it off to show one combined row for all part locations. The combined row shows quantity information across all locations.
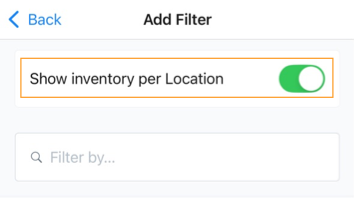
In the List View (Mobile Application)
The Show inventory per Location toggle in the filter options (Select (filter icon) to access) of the Parts Inventory module controls how MaintainX shows parts in the List view.
-
Toggle it on to show one table row per part location 1. Each row displays quantity information for that location 2.
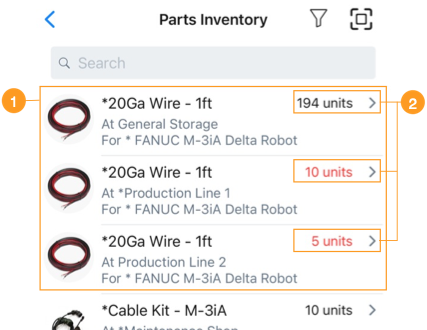
Screenshot of expanded list view on in the MaintainX mobile application showing parts inventory across multiple locations. -
Toggle it off to show one combined row for all part locations. The combined row shows quantity information across all locations.
Work With Multi-Location Parts
Multi-location parts change some MaintainX workflows slightly because you need to consider part locations when you perform certain tasks. This section explains how part location affects specific tasks.
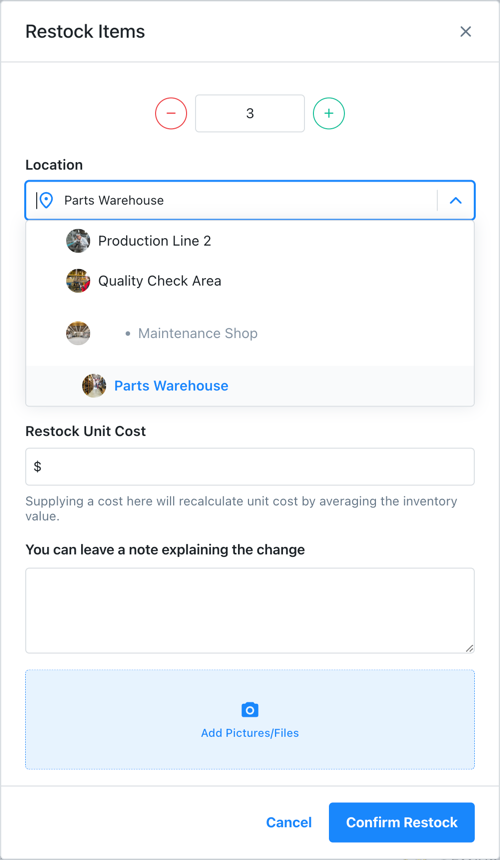
When You Restock Parts
When you restock parts, you have to choose which location to assign the restocked parts to.
For more information, see Restock Parts.
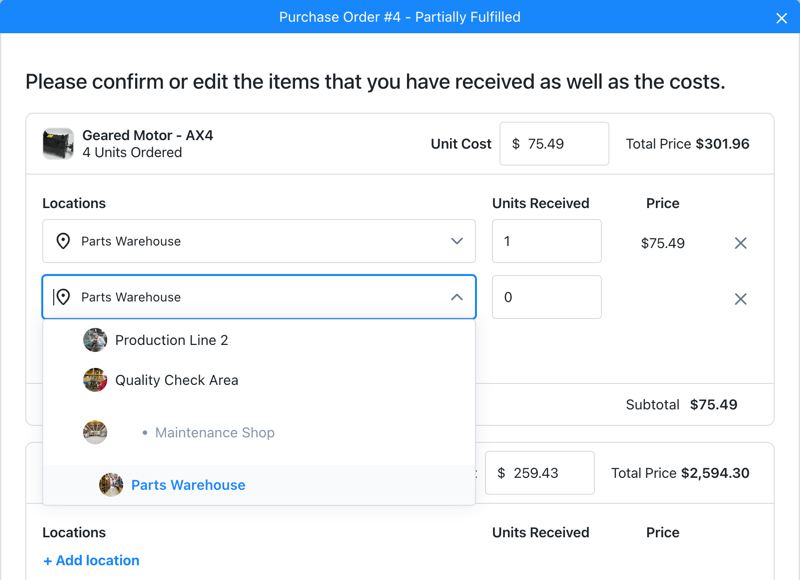
When You Fulfill a Purchase Order
When you fulfill a purchase order, you need to specify at least one location for every part you fulfill. You can also split the received quantity of every part between multiple locations.
For more information, see Fulfill a Purchase Order.
When You Conduct a Cycle Count
When you create a cycle count that includes parts in more than one location, the cycle count dialog includes a separate line for each location so you can count them separately.
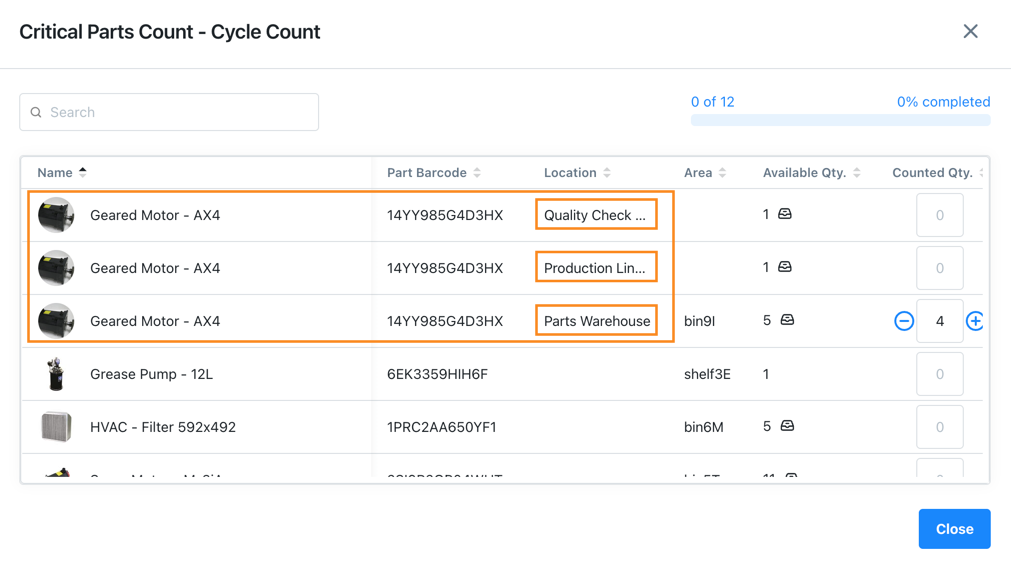
When users scan a barcode or QR code to start counting a part, they can specify the location that they're counting for.
For more information, see Conduct a Cycle Count.
When You Create a Work Order
When you create a work order, you have to choose which location to take the required parts from.
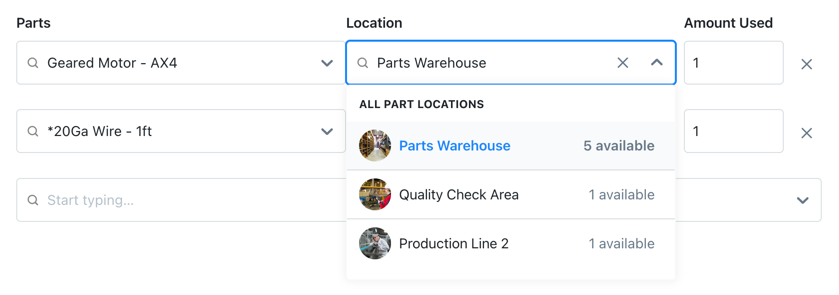
For more information, see Create a Work Order.
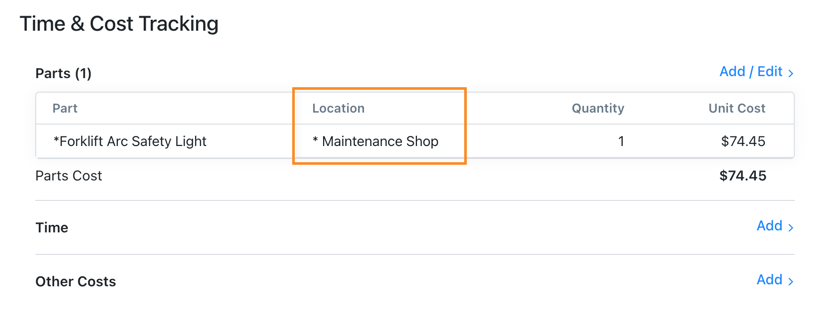
In the work order details, the Time & Cost Tracking section shows the location for the parts that you used.
When You Share Parts Between Organizations
Companies that have more than one MaintainX organization can share parts between organizations. If your organizations include multi-location parts:
-
When one organization approves a parts request from another organization, the approving organization has to specify which of its locations to take the parts from.
Choosing a location when approving a parts request -
When one organization receives the requested parts from another organization, the receiving organization has to specify which location to assign the parts to.
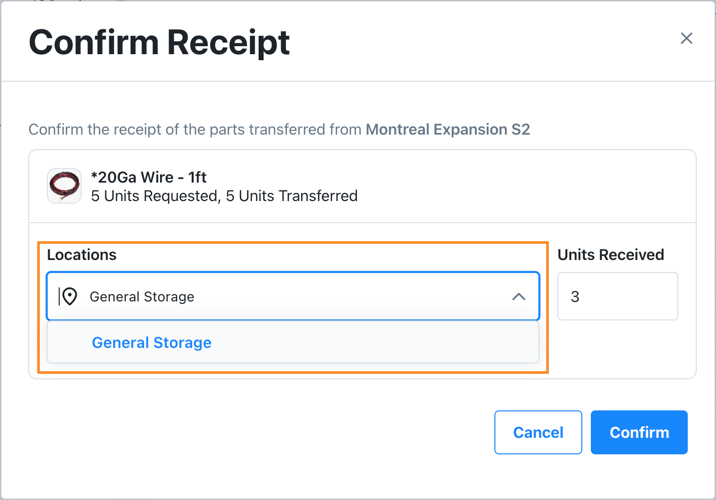
Choosing a location when receiving requested parts -
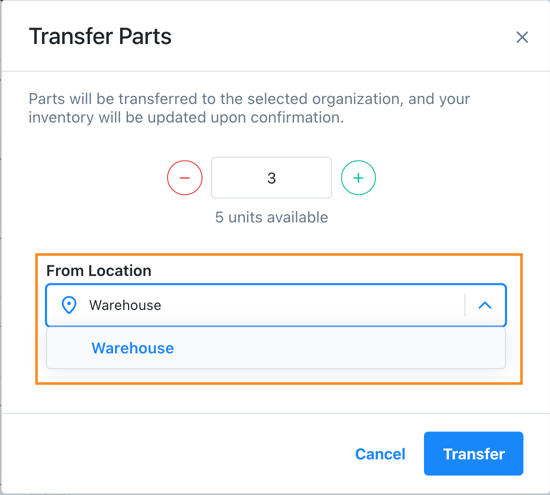
When an Administrator transfers parts from one organization to another, they can specify:
-
Which location in the source organization to take the parts from.
-
Which location in the destination organization to add the parts to.
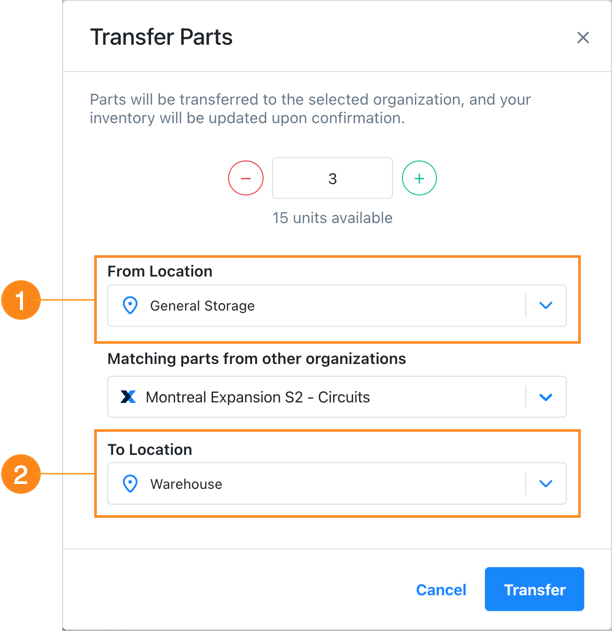
Choosing locations to transfer parts to and from
-
For more information, see Share Parts Between Organizations.
When You Install an Asset Package
When you install an asset package that includes parts from the MaintainX Asset Hub, you can specify which location to assign the parts to.
When You Export Parts Data
Multi-location parts affect the following data exports:
-
Parts: The exported CSV file has a separate line for each location. See Part Exports.
-
Part Transactions: The exported CSV file shows two types of part quantity data:
- The Location-Based Quantity Before/After columns show the quantity at the part location before and after the transaction.
- The Quantity Before/After columns show totals across all part locations before and after the transaction.
Change the Default Part Location
Every part in your inventory must have an assigned location. If you don't choose a location when you create a part, MaintainX uses the default part location. You can change the default part location any time.
Changing the default part location doesn't update any existing location assignments, but new parts that you create will use the new location.
To change the default part location:
-
From the sidebar, open the Settings menu and in ORGANIZATION SETTINGS, select Features.
-
On the Features tab, navigate to the Locations section, and select Set Preferences.
The Locations settings page opens.
-
Navigate to the Default Part Location section, and select a new location.
Integration Issues with Multi-Location Parts
MaintainX integrations that were created before we introduced multi-location parts can fail when they attempt to update fields related to a part's location via the REST API.
If an integration uses deprecated parts fields, MaintainX temporarily deactivates multi-location parts for the organization. This prevents the organization from creating parts with multiple locations, which could cause the integration to fail.
Organization Administrators can reactivate the feature from the part settings. However, MaintainX recommends updating the integration before reactivating multi-location parts.
For a detailed description of the issue and the recommended solution, see the following troubleshooting articles: